


Pets
Return to: Client User Guide – Enhanced
| Pets |
| By Miss Echo of Spellweave.com, Reproduced with Permission. |
| Enhanced Client Guide Index |
![]()
Menu Pet Commands are accessed in two ways:
1. <RIGHT CLICK> the name of your pet in the: a) ‘active target’ bar, b) the pet bar, or c) the bar dragged off your pet (Legacy Targeting option c only). In Publish 86 the ‘rename’ option is added to this list.

2. <SHIFT> <RIGHT CLICK> on your pet, (<LEFT CLICK> on your pet for Legacy Targeting)

Verbal Pet Commands may be made by either just talking in game, by creating a Macro or using the ‘Action’ buttons (dragged to a hotbar).
1. To just talk type: <enter> all kill <enter> (or all follow, all stay etc), if in Legacy chat mode just type ‘all kill’ <enter>.
2. To set a ‘Say’ Macro, go to the Main Menu  from your hotbar – Select Macros – Click create, which will open the edit and action boxes, left click in the ‘no icon set’ box to bring up the pop up ‘picture’ icons, scroll down and left click to select the
 ![]() (or another if you prefer) Then drag the required actions from the ‘pet command menu in the actions box’ to the empty box below your ‘picture’ icon. If you wish to say something ‘different’ to the defaults, eg: “Sooty Kill” then drag in the
(or another if you prefer) Then drag the required actions from the ‘pet command menu in the actions box’ to the empty box below your ‘picture’ icon. If you wish to say something ‘different’ to the defaults, eg: “Sooty Kill” then drag in the ![]() say icon from the communications menu and type the text you want. Press Ok, enter a Name for your macro to identify it, eg: ‘Stop Follow Guard’, press ok. Find the macro in your macro list and assign a hotkey if you wish or drag the Icon to your hotbar for ‘one click’ access’. The example below shows a macro set up to to say “all stop”, “all follow me”, “all guard me” with one key assigned or one ‘click’ when dragged to a hotbar, and what it should look like in the macro box and ‘in game’ when used.
say icon from the communications menu and type the text you want. Press Ok, enter a Name for your macro to identify it, eg: ‘Stop Follow Guard’, press ok. Find the macro in your macro list and assign a hotkey if you wish or drag the Icon to your hotbar for ‘one click’ access’. The example below shows a macro set up to to say “all stop”, “all follow me”, “all guard me” with one key assigned or one ‘click’ when dragged to a hotbar, and what it should look like in the macro box and ‘in game’ when used.

3. You may also just drag the ‘Action’ from the pet command menu in the actions gump directly to a hotbar. The current default ‘actions’ are shown below. Additional actions introduced in publish 86 can be seen in the newer, blue gump.


Hints
* You may also add additional commands in the command box of your macro. Eg, My Tamer has HIDE as a skill, so on saying ‘all kill’ she gives the command and then hides automatically. The ‘hide’ command was added to the command line in the macro by dragging the hide skill icon from the skill menu to the third command box set to target self, you could also add an invisibility macro if you wished by dragging the Invisibility spell from your spellbook to target self on the pressing of the ‘Kill Command’ icon. You need to put a ‘delay’ action in between ‘say’ part and the ‘skill’ or ‘spell’ to allow for targeting, approximately .3 secs is a good average. The set up for an extended pet command with ‘hide’ is shown below.

* These menu/verbal commands also apply to ‘summons’ such as Earth Elementals etc
* Further information on setting macro’s see: Macros
Top
Naming a Pet
To name a pet or change it’s name, dismount then use the ‘rename’ option in the pet’s context menu.

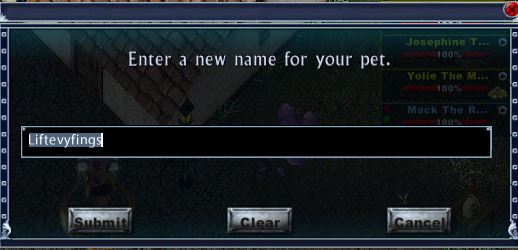
Change the name and press ‘enter’ to ‘set’ the new name and you should get a message stating Pet <name> renamed to <name>.
Top
Menu Stable Commands are accessed in two ways:
1. <RIGHT CLICK> the name of the NPC Animal Trainer in the ‘active target’ bar, or the bar dragged off the NPC.
2. <SHIFT> <RIGHT CLICK> on the NPC, (<LEFT CLICK> the NPC Legacy Targeting)

* Verbal stable commands such as ‘stable’ or ‘claim list’ may be made by either just talking, or by setting a ‘Say’ Macro. The process for this is the same as above for pets using the ‘say’ command from communications in the actions menu. Saying ‘claim list’ will now bring you up a list of pets you have in the stable. New ‘action’ commands in publish 86 include ‘stable’ ‘claim pet’ and ‘stablecount’. Claim pet will bring up a list of all the pets in your stable. Stablecount gives a message showing how many of your available slots you have filled, example: ‘5/14 stable stalls used’
Hints
* If you only have a couple of pets it could be worthwhile making a ‘say’ macro to claim them from the stable ie: ‘claim <giant beetle name>’ or ‘claim <horse name> then drag the macro icons to a hotbar to just click once to ‘say’. Alternatively, you may just ‘talk’ <enter>Claim Darque<enter> to perform the same function. Note this will only work if your pet’s name is of one word length. Pets names with 2 words or more will not call out of the stable this way.
* Put your pets on pet summoning balls (available off player vendors, or by obtaining one doing the bag of sending quest see: Spellweave Quest menu, and drag the ball to a place on your hotbar for easy access.
Top
SA allows you to ‘store’ a target to vet your pet with aids or to cast a heal on them. This may be done in two ways, by creating a macro, or by dragging your aids or spell to a hotbar and selecting the ‘target’ and then ‘stored’ by right clicking. This targeting is NOT available if you have Legacy Targeting selected in User Settings. A sample macro is show below:
Publish 86 extended this ability to allow up to 5 pets to be stored. Several pet images have also been added to allow for more recognisable labelling of your macros.
Miss Echo’s method for pet healing is still possible, but a newer method possible since the publish can be found below Miss Echo’s, illustrated by the blue gumps.


I have used the chivalry sacred journey graphic as my ‘nightmare’s’ picture when creating, you will need to select whatever picture icon you like for your pets. Drag your bandies into the command box and right click on them to bring up the ‘target’ menu option, select ‘stored’ and you will get a cursor to target your pet. Once this is done the pet targeted by this macro will always have the bandaid applied when triggered. If you regularly fight with 2 or more pets then a separate macro for each would be required where the stored pet is different, although you can use the same bandages. You may use a greater heal spell instead of the bandages if you prefer to heal that way, the targeting is the same by right clicking and selecting ‘stored’.
If you just wish to drag the aids or spell to a hotbar and right click to target this way you may, however it would only be effective for one pet and you would need to edit the ‘stored’ target if wishing to heal another pet that is different from the original pet stored.
If you generally fight with a maximum of two pets, I have found the most effective way to ‘set up’ is create two macros. One for your main pet and one for your second pet. Assign these two macros to two keys you wish to use for vetting. In the example I vet my main pet using F1 and my second pet with F2, these are assigned in the macro box. If I change my pets from say a Rune Beetle and Mare combo to a White Wyrm and Mare combo, I only need to right click the ‘main pet’ icon in the hotbar and retarget the new pet to ‘store’ it. It means that the F1 and F2 keys do not change, just the ‘target’ pet for applying the aids. By dragging the macro icons to the hotbar it means you do not need to enter the macro box to ‘edit’ just edit from the hotbar.

Using the new ‘store’ and ‘target’ pet icons can be done as follows:
First use the ‘store’ icon in a hotbar slot and target the pet. Then use the matching ‘target’ icon in a macro with bandages.
 The hotbar of ‘stored’ pets could be set to ‘auto-hide’ if required, being only used if you re-select a different pet. In the hotbar of stored pets you see a dragon, a nightmare, a bane dragon, a cu sidhe and a rune beetle. In fact the bane dragon icon has been used for a dread war horse.
You will see from the macro name that the pet2 stored is sometimes switched between the two pets ‘Sonata’ and Crescendo’.
The first icon in the macro is the ‘target’ for pet2, The game recognises different bandages. To avoid failing to heal through having the wrong bandage type all 3 types I may possibly use are included in the macro. It will therefore use whichever it finds. The yellow bandages pictured are ‘enhanced bandgages’ the white are normal bandages, the red are from a bandage summoning talisman.
Top
Pack Animals (Giant Beetles, Pack Llamas etc) have the additional ‘Open Backpack’ menu selection on the Pet Command menu (see above).
Healing Pets Dragging a pile of bandies to your hotbar will give you an ‘instant’ count on how many you have remaining. Right click the bandies in your hotbar and select <target> <cursor> to give you an instant target cursor to heal a pet when targeted on its bar. This is handy for vetting pets in your party. You can also set this as per the macros above, only use <target> <cursor> instead of ‘stored’
Fighting with Pets I have found it most useful to drag the health bar off pet/s prior to going out to fight and placing it somewhere convenient on your screen. This applies to your own pets and anyone else’s pet in your party. The bars will stay where you place them, even when recalling, and you may target the bar with a bandy or right click it to bring up the pet command menu rather than try and find a pet in the middle of a fight or worry about what the active target is. Left clicking on the bar will make the selected pet the active target. The bar may also be used to target the ‘stable’ cursor command to put your pets away after fighting.
Added in Publish 86 is a new dockspot similar to the ‘mobiles bar’. For a detailed explanation see the Mobiles Bar section of the main index. This makes monitoring your pet’s health and selecting its context menu much easier.
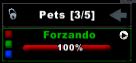 The lock will lock the feature in place on your desk top. the number of follower slots used is shown, the arrow closes the bar if it is not needed. Forzando, being a Dread War Horse, takes 3 of the 5 follower slots, as illustrated. The features on the pet’s actual healthbar are discussed in the ‘Healthbars‘ section of the main index.
Animal Lore: Tamers may find it useful to put the Lore Skill Command Icon  into a hotbar, right click and assign the target to cursor to give you a target cursor to lore pets.
Feeding Pets: As SA will allow you to place backpacks and other containers into hotbars it is handy to put your pet food in a bag in single units, ie 1 x apple x 3 times, 1 x meat x 3 times etc so when fighting and needing to feed you do not need to fiddle in your main backpack looking for food. Place your food container in a hotbar, click once and it will open, take out the food and dump on the pet to feed direct from the hotbar. It is best to put single units in as then you do not need to separate bundles of food which is a problem in the middle of a fight if your pet becomes unhappy.
Top
Last modified: October 2, 2014