


The Warrior/Fighter
Return to: Kingdom Reborn New Player GuideKingdom Reborn New Player Guide
Skill Training & New Player Quests:
The Warrior/Fighter
Written by MissEcho
Training and Quests for the Warrior/Fighter Classes
(Warrior, Paladin, Samurai, Ninja Templates & Archer)
Depending on your template you may do some or all of
these quests, it is your choice. If you elect to do them all then
determine which skills you wish to end up if you are just training for a
warrior, i.e. do you want to end up with sword skill, fencing or
macing if so
do the one you wish to end up with last and drain off the unwanted skill/s by
toggling the skill arrow down. Most fighter classes have a number
of common ‘skills’ that may be trained consecutively. While all skills and
templates may be different I have marked the most ‘common’ skills generally
used together by most characters in this class with an # The majority
of warrior types use ‘chivalry’ skill, mainly for the ability to recall* but
also for the additional damage modifiers the skill gives,
most have one weapon skill then some specialise in either the samurai or
ninja classes.
So a make up of ‘standard’ Warrior/Paladin would be Anatomy,
Heal, Tactics, Weapon, Chivalry, Parrying and Focus (7 skills at 100 points
with the reduction in the Focus skill if taking skill/s to120 later on).
A ‘standard’ Samurai would be Anatomy,
Heal, Tactics, Weapon, Bushido, Parrying, Chivalry 80 /Focus 20 (8 skills, 6
at 100 points with 2 skills split as shown. If taking one of the first 6
skills to 120 then the reduction would generally come from Chivalry/Focus or
Tactics)
A ‘standard’ Ninja would be Anatomy,
Heal, Tactics, Weapon, Ninjitsu, Hide, Stealth all at 100 points, however if
wanting to recall* then some chivalry is needed so the reduction would come
from Tactics 90, Heal 80, Stealth 80 to allow 50 points for chivalry.
A ‘standard’ Archer would be Anatomy, Heal, Tactics,
Archery, Chivalry, with (Bushido or Focus or Resist Magic) or (Stealth
& Hide) or (Music and a bard skill) depending on if wanting a
pure type archer, with bushido, stealth or a bard skill.
Obviously the above is a subjective ‘guide’ only, how you
put your skills and allocate points is really up to you, you may wish your
ninja to have high level poisoning skill in which case something else has to
be sacrificed. eg sacrifice Anatomy and Heal and just use the Chivalry spell
to heal with and rely on your hiding and stealth to ‘escape’ when you are
really injured. Or if you want poisoning or hide on your warrior, you could
sacrifice Parrying and/or Focus. Magic Resistance is also a skill used
by a lot of warrior templates but is discussed in the Spell-Caster Class,
you can raise this while training as a warrior as another concurrent skill
so keep an eye on the points gaining in this area and grab the quest for it
if it gets up.
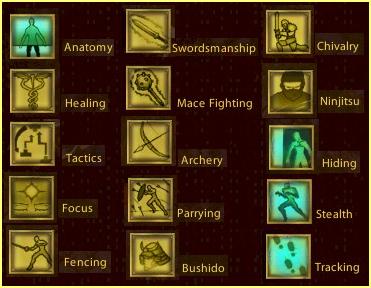
Skills with New Player ‘Skill
Training’ & Quests
Available
| # Used in most warriors | Weapon Skill x 1 | Samurai | Paladin | Ninja |
| Anatomy Healing Tactics |
Swordsmanship Fencing Macing Archery |
Bushido Parrying |
Chivalry | Ninjitsu
Hide Tracking |
Which ‘template’ you started with, will determine the order of your quests. To do all the quests in this class you will need at some point to
purchase some books. These range in price from 130gps for the chivalry
book to approx 280 for the bushido/ninja books. So you would be best to
start with the chivalry book if you didn’t start as a Paladin, until
you get more gold to buy the others. You do NOT need to buy skill for
Focus as by the time you have run around buying skills and then going
around again to get the quests you will have nearly reached or exceeded
the 40 points in this skill that you would buy anyway. Also keep in mind
you need to buy some bandages to heal with or if a paladin some ‘tithe’
points and bandages. As you see your 1000gps will not go far.
Buying Skill
Firstly find the Instructors on the map for Anatomy and Heal, go to
these instructors and purchase either the additional 10 points (warrior
template) to bring them both up to 40, this will cost you 200gps (100gps
per 10 points of skill) or 40 points in each (paladin, samurai or ninja
templates total of 800 gps)
The paladin, samurai and ninja should now have 30 points in 4 skills
and 40 points in anatomy and heal. The warrior will have 30 in 2 skills
and 40 in 2 skills. Each class will have a weapon skill, plus heal
and anatomy, which is enough to get you fighting for a little more
gold. The warrior can purchase an additional 60 points of skill
(suggest spending 200 on the 2 skills at 30 points to bring them up to 40
and buying 40 in parrying for 400gps) All templates will now have 200gps
left with which to buy some bandages from the healer. It wont hurt
at this point to spend the whole remaining 200gps on bandages as you will
need them.
Accepting Your First Quest
Firstly check your skills menu and see how many points your Focus
skill has gained in all this running around (all templates, but especially
critical for the samurai who started with 30 points in this skill) . If it
is over 40 points, then I suggest you go straight to the Focus Instructor,
and take the quest off him. By the time you make a bit more gold to
buy more skill you should have made the 50 points to be able to finish the
Focus quest and clear your Quest menu of the new player focus quest to
enable you to purchase more skills. If it is still between 20 and 40
you can go and begin fighting before getting any quests. To accept
the quest off the Focus Instructor double left click on him, a menu will
open for you to read, select ‘accept’.
Your First Fight
Ok, now you’re good to go but first you may want to know how to set a
bandage to heal yourself. No point in dying as the first thing you
do! There are a number of ways to set a bandage to heal
yourself.
1. double left click the bandages in your backpack to give yourself
a target cursor, and click on yourself.
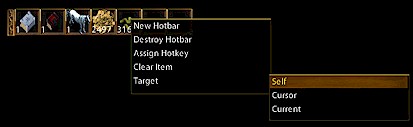
2. drag the bandages to an empty spot on your hotbar and the graphic
will appear there, the actual bandages remain in your pack, <right
click> on the bandages in your hotbar and a further menu opens, select
‘target’ then select ‘self’. When you click once on these bandages the
bandage will automatically apply to yourself. If you did not change the
hotbar key assignments pressing the number shown in the box you put them
in (1-0 – or =) will also apply them. If you want to assign them to a key
of your choice right click the box, select ‘assign hotkey’ and select the
key you wish to use, eg the number 3 key on your keypad or F1 etc.
3. create a macro. To set as a macro, go to the menu bar,
select Main Menu/Macros-Actions here will be a box to make your macro
in. Select ‘create’ and a further box will open with 2 boxes.
The box on the left is where you select a ‘picture icon’ to recognise your
macro by, left click once and select an icon that you will remember. Next,
drag your bandages from your backpack to the right hand box (command box).
The bandage graphic will appear there. <right click> on the
bandages and then select ‘target’ ‘self’ and then click ok. Name your
macro Heal Me or whatever you like and press OK. You will see that the
picture icon you selected now appears in your macro box with the name Heal
Me next to it and the words ‘no key binding’. To assign it a key so that
when you press it the bandages apply, <right click> on the picture
icon and select assign hotkey, press which keys you want to use to apply
the bandages. Whatever keys you press will show up where the words no key
binding were eg if you selected ctrl b as your keys they will show. For
more information on macros and how to set them, take a look here User
Guide Macros.
Now you have your bandage sorted out it is worthwhile to ‘test’ that it
works especially if you have assigned it a hotkey. Make sure you are on
the ‘system’ tab in the chat window and press the key you selected to play
the macro on. It should say ‘that being is not damaged’ if it is working
correctly. If it is you are ok, if not have another look at how you have
it set and restart.
Once all is good, head to the east, the way you came in and back down
to Old Haven. Open your map if you can’t remember the way by
clicking on the map icon in your menu bar. To look at the larger map click
the small square at the top of the round (radar) map, click the ‘tick’ in
the right hand corner to return it to the small one. Gaining skill in Old
Haven is much quicker than anywhere else as the skill gain in that area is
‘enhanced’ so you obtain anywhere from .1 to .5 a ‘gain’. As a very
new player with low skill I suggest you firstly aim at killing
zombies. They are slightly easier than the skeletons and a lot
easier than the spell binders you see around the town. Kill as many as you
like and watch your skills go up in the system window. Make sure you loot
your kills of gold and items and put on any armor you find that is better
than what you have. If you get injured it is pretty easy to run to avoid
death while you heal up. Bandages at your level often ‘fail’ a lot so
don’t rely on them! Learn to run!
Now it is just a matter of watching your skills go up and getting some
gold together. As soon as you have more gold go and buy more skills and
any books you need. Remember only take quests when you think you are close
to the 50 points so around 45 points is a good guide. You will learn as
you go which skills are going up faster than others so will be able to
judge the right time to get the quests. It is a matter of balancing the
gains to when you take the quest so that you don’t have a quest ‘sitting’
on your character too long. Remember you cannot buy training in a new
skill if you have a ‘current’ new player quest active.
Skill Tips
Anatomy: the icon for anatomy may be put in a hotbar (open skills
menu, find anatomy and drag the icon to the hotbar), set target to ‘cursor’
and clicked to provide a cursor to target yourself, monsters and npc’s. You
will get gains this way however anatomy gains reasonably quickly just with
healing and fighting.
Healing: This will rise with anatomy as you fight. Gained
only through the use of bandages.
Tactics: is used for additional damage and the ability to use the
weapon specials when fighting. It will gain fairly quickly as you fight. You
do not need any ‘special’ training tips on this one as it is a passive gain
skill.
Focus: is the easiest skill to raise. You will gain focus
just running around. It will always be the first skill to reach 50 of all
the fighting skills. Focus increases your stamina and mana regeneration
capability. This skill is often taken out and replaced with items that give
regeneration on tight templates where not enough skill points are available
to achieve the skills you want. Humans always have 20 points in focus as a
hidden skill due to race.
Weapon Skills (sword, fence, mace including archery): gains in this area are only by
fighting. The more you fight the quicker the gains. A warrior needs to
allocate at least a full 100 (grandmaster) level to be really effective in
this skill. More than that is again ‘subjective’ as to the benefit of
scrolling up for more depending on the type of player, i.e. player v monster
(pvm*) or player v player (pvp*)
Bushido: Requires a bushido spellbook available from the bushido
instructor. Spells to cast at low level = confidence, honorable execution and counter attack. Cast as often as possible to gain. Note,
any spellbook may be placed in a hotbar to ‘1’ click open. The process for
adding a spell to a hotbar is to open the spellbook, drag the icon to an
empty spot on the bar. You may then <right> click to set the target. The process to set
as a macro is the same as for bandages, just drag the icon instead of the
bandages.
Parrying: this skill is very useful for defence and is generally
used with a shield on a warrior or a two handed weapon on a samurai. The
most effective way to train parry in Old Haven is to un-equip your weapon.
equip a shield, go into war mode and left click on 1 or 2 spellbinders and 1
zombie. Parry gains will be quick and if you bandage at the same time your
anatomy and heal gains will also rise. Disarming and just targeting a
few spell binders will rapidly raise your magic resistance as well. Training
this way is probably the quickest way to gain in all these 4 skill areas.
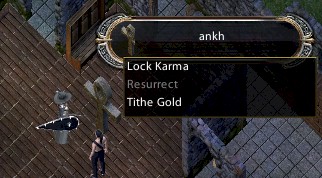
Chivalry: Requires a chivalry spellbook available from the
chivalry instructor. To use any chivalry spell, you need to ‘tithe*’ gold. (Which
is basically the ‘cost’ of the spell, 10gps per cast) This is done by going to the north
end in the warriors guildhall to the ankh. Left click on the ankh, to
place it in the target bar, right click on the bar and the menu appears,
select ‘Tithe Gold’ and then toggle the arrows to the amount you wish to
tithe. Note; the quest giver for chivalry is up the stairs in the main
part of the guildhall and then along to the north. If you started as a
paladin and followed the above ‘order’ in buying skill, then as soon as you
have a few hundred gold you should tithe it so that you can start training
in chivalry. The better skills to cast at low level = consecrate weapon,
close wounds and divine fury. Cast as often as possible to gain. Note
also that with the chivalry class the higher your Karma the more effective
your spells are. For more information on Karma view: Reputation.
Chivalry is the main skill used by warriors to ‘get around’ using the
Sacred Journey spell. Even most non-mage templates try to include this
just for ease of game play. It is worthwhile as a new player to keep your
chivalry skill at at least 50 points in the short term until you find your
bearings.
Ninjitsu: Requires a ninjitsu spellbook available
from the ninjitsu instructor. Spells to cast at low level = focus attack,
animal form and mirror image. You may also do a backstab attack assuming
you also have hide and stealth at the appropriate skill. To gain the 50
points required to complete the quest, animal form and mirror image cast
as many times as possible while fighting will raise the skill quickly.
Hide: You may drag the hide icon out of your skills gump to place it on a
hotbar. This may also be assigned a hotkey or have a macro set.
Again the same process as used to set bandages. You will only be able to
purchase 33 skill points off the hiding instructor and this is a slower
skill to gain then any previous discussed. Gains may be made when
you fail or are successful in hiding, hiding gains may also be gained as
you ‘stealth’ around.
Stealth: You must also have the ‘hide’ skill to use stealth. To
stealth, you must always hide first then try to walk. This is another slow
skill to gain in as it requires a successful hide before you can perform
the stealth. Hiding and stealthing while you move between fights is a way
to make gains a little less painful, although while it is slower to 50
than the others, in Old Haven due to the enhanced gain area it is still
much quicker than doing it anywhere else.
Tracking: Another skill where you may drag the icon out of the skill
menu to a hotbar. When activated by clicking it will open a menu and ask
what type of creature you wish to track. It is best to select something
you can see on your screen. Gains are made on just using the skill, you do
not need to actually ‘track’ the creature you pick.
Quest Descriptions & Rewards
| Gain 50 points in: | Quest Reward (blessed*) | Item Properties | Quest Giver |
| Anatomy | Tunic of Guarding (tunic) | Hit Point Inc 2, Reflect Physical Dmg 5%, Resists 27 in total. |
Andreas Vesalius the Anatomy Instructor |
| Healing | Healers Touch (gloves) | Stamina Inc 3, Reflect Physical Dmg 5%, Resists 27 in total. |
Avicenna the Healing Instructor |
| Tactics | Arms of Armstrong (sleeves) | Strength bonus 3, Hit point regen 1, Resists 27 in total. |
Alden Armstrong the Tactics Instructor |
| Focus | Clasp of Concentration (bracelet) | Stamina regen 1, Mana regen 1, Resists 10 in total. | Sarsmea Smyth the Focus Instructor |
| Swords | Jockles’ Quicksword (sword) | Hit chance inc 5%, swing speed inc 10%, dmg increase 25% |
Jockles the Swordsmanship Instructor |
| Fencing | Recaro’s Riposte (war fork) | Hit chance inc 5%, swing speed inc 10%, dmg inc 25% | Recaro the Fencing Instructor |
| Macing | Churchill’s War Mace (mace) | Hit chance inc 5%, swing speed inc 10%, dmg inc 25%, lower requirements 70% |
Churchill the Mace Fighting Instructor |
| Archery | Heartseeker (composite bow) | Hit chance inc 5%, swing speed inc 10%, dmg inc 25%, lower requirements 70% |
Robyn the Archery Instructor |
| Bushido | The Dragon’s Tail (sword) | Hit stamina leech 16%, swing speed inc 10%, dmg inc 25% |
Hamato the Bushido Instructor |
| Parrying | Escutcheon De Ariadne (shield) | Reflect Physical Dmg 5%, Defense chance inc 5%, energy resist 1% |
Tyl Ariadne the Parrying Instructor |
| Chivalry | Bulwark Leggings (armor) | Stamina regen 1, Mana regen 1, Resists 27 in total. | Aelorn the Chivalry Instructor |
| Ninjitsu | Silver Serpent Blade (kryss) | Hit chance inc 5%, swing speed inc 10%, dmg increase 25% |
Ryuichi the Ninjitsu Instructor |
| Hide | Bag of 20 Smoke Bombs ** | Chiyo the Hiding Instructor | |
| Stealth | Twilight Jacket (tunic) | Hit Point Inc 3, Reflect Physical Dmg 5%, Resists 27 in total. |
Jun the Stealth Instructor |
| Tracking | Walkers Leggings (leather legs) | 38 Resists | Walker the Tracking Instructor |
* blessed: a blessed item is one that does not require
insurance* to protect from loss. Any blessed item will remain on your
body if you die and will be in your backpack when you are resurrected.
** not a blessed or named item, these may be crafted by a cook.
Click the links below for Training Guides
Spell-Caster which
covers the Mage and Necromancer Classes
Trade/Crafter which
covers the Blacksmith/Trade Class
Last modified: October 18, 2011