


Skill Training and New Player Quests
Return to: Kingdom Reborn New Player GuideKingdom Reborn New Player Guide
Skill Training & New Player Quests
Written by MissEcho

Now you have created your
character, and visited Gwen the tutor, you find yourself in the town
of New Haven. Gwen has directed you to visit with Sir Helper,
the Profession Guide. He stands just outside the bank and you
cannot miss him as he will ‘spam’ at you for ages asking if you need
help until you double left click on him! So do it! A
list will open up giving you directions to the Instructors available in the
town, so you may wish to refer to him when you are looking for
someone later on.
Brief Client Overview
It is probably worth stopping here and having a brief look at
the basic Client User Interface for Kingdom Reborn before you take up any skills,
quests or start your training. While Gwen showed you the basics in navigating
some functions, the user interface does take some learning.
Full details on using the client are shown here: UOKR
User Guide, however as a simple guide while learning it is enough to
view the following Menu Bar located on the bottom right of your screen as I
will refer to this as we go along. Clicking once on any of the ‘Icons’ will open the
window or menu for the item listed.

One of the most important things to look at in this menu
bar before you set out, is the user settings. So firstly click on
Main Menu/User Settings and have a look at the various tabs in this
window. One to pay a lot of attention to is the one that says ‘Bindings*‘.
This is where the default ‘hotkeys’ are set. Most players prefer to
set their own hotkeys for frequently used actions as a lot of people tend
to use the F1-12 keys for macros and so clear the default ones out as a
first priority. You may clear out some or all of the bindings
(defaults) shown here by clicking once on the ‘action’ and pressing
<esc> to clear the default hotkeys from the binding. Don’t worry
about ‘messing’ any thing up as you can always get them back by clicking
on the use default bindings or legacy bindings to return the pre-set
defaults.
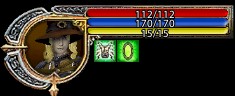
Another handy screen to know about is your ‘Character
Sheet’. This may be opened by double left clicking on your
health/buff bar or by opening your paperdoll and clicking the small head
on the bottom left corner. The character sheet is where you can view your
current stats for hit points/stamina/mana, strength/dexterity/intelligence
as well as the amount you can carry i.e. your weight. This is important to
keep an eye on as it is directly related to your strength, and if you
become ‘overweight’ you will not be able to run or move. Your weight will
display as the amount you are carrying to the amount you can carry eg)
89/235 so 89 out of 235 stones.
Health/Buff Bar
The other important part of the screen to note is the Main
Fixed Hotbars located on the bottom left of your screen. On the left is
the crossed swords, which as Gwen instructed will toggle you between war
and peace mode. Next to these are two icons which will display your weapon
‘special abilities’. In this case the character has empty hands so
the abilities are for the wrestling skill. If you equip a weapon of
any type, these icons will change to the abilities those weapons give. The
numbers 1-0 and the minus (-) and equals (=) in the hotbar are the
default keys assigned to anything you put in those boxes. So if you
press the key 1 on your keyboard the ‘disarm’ special ability will work
(assuming you have the correct level of skill to use it). To remove these
defaults right click on the box and select ‘assign hotkey’ and press
<ESC>. To remove any item or icon in the 12 hotkey boxes <right
click> on the box and select ‘clear item’. The bold number 1 in the gold box indicates the number of the
hotbar you are using, and the up and down arrows will scroll through the
fixed hotbars 1-9. Any item you place in a hotbar, ie a skill icon,
bandages, potions, spells, spellbooks, runebooks, weapons, may have a ‘Target’ selected by right
clicking on the item, selecting ‘target’ then ‘self, cursor or current’.
Most players only use the visible hotbar (1) for frequently used spells
and items. Additional ‘floating hotbars*‘ may be created by
<right click> on the bar and select ‘new hotbar’.
Main Fixed Hotbar
![]()
How do I Talk*?
Lastly you will see a transparent window with two tabs
labelled ‘system’ and ‘chat’ which is where your chat text appears.
The ‘system’ tab is where information on log-in appears, and where system
messages regarding ‘actions’ will be seen, i.e. ‘You begin to apply the
bandages’. The chat tab is where what you say in game will
appear. There are two ways to ‘talk’ in game. The KR default
chat where to speak you type <enter> type your text here
<enter> or if you find ‘enter’ to talk difficult you may wish to
change this in your (Menu Bar no.8) Main Menu/User Settings/Interface Tab and
put an ‘x’ in Legacy Chat Mode and select ‘yes’ to legacy bindings. This will mean you can just type your text and press <enter> to
talk. (note however that if you change to legacy chat mode the numbers 1-9
– & = keys in the above hotbar will not work as assigned keys, however
most people assign keys of their choosing to these so it could be worth
just removing the defaults anyway).
OK so that covers the ‘basics’ of the user interface, now
for the fun stuff!
Training and Completing the New Player Quests
For the purposes
of learning Ultima Online as new player, I have designed this guide to
maximize the amount of new player quests you may complete and assist your
training by
character types:
Warrior/Fighter which covers the
Warrior, Paladin, Samurai and Ninja Classes
Spell-Caster which
covers the Mage and Necromancer Classes
Trade/Crafter which
covers the Blacksmith/Trade Class
The same process maybe used
for both clients (KR and 2d) as in maximising how many you complete or how
far you wish to train before heading off into the world, however any ‘how
to’ instructions will be for the KR client due to the difference in user
interface. You may of course head straight down to the moongate* and not
do any training or quests in New Haven but if you are a genuine new player
it is worthwhile spending some time here just so you at least have a grasp
of the basics before heading out.
Just a note of warning: a ‘young*’
character loses their ‘young’ status when they reach 450 skill points, so if
following this guide you will most likely lose your ‘young’ status on the
character you are using. It does not affect any other character on your
account that you create afterwards. They will still be ‘young’. If you
want to explore a bit before losing ‘young’ status then keep an eye on your
total skill point tally in your ‘skill’ menu on the menu bar. The
total of your ‘skill points used’ is on the bottom right corner of the menu
when it opens.
Your training will depend on what type of character you created.
If you created a warrior/fighter class, a spell-caster class or a
trade class and wish to end up in that class as a samurai, mage,
smith etc, then follow the training guide for that
class.
If you started a spell-caster but wish to end up a warrior or
vice versa then complete the training and quests for the first
‘class’ then toggle the skills down in your skills menu, buy more
skill and accept quests for the next class. You may, of course,
do all three classes this way to obtain every reward on offer, even
if you started a warrior and want to end up as a warrior. It will
just mean you will not use your pre-set warrior skills to start but
turn them down or lock them and complete the spell-caster or trade
class skills first!
To toggle your skills go to the menu bar, select skills and
inside there is a small arrow next to the skill you wish to toggle,
turning the arrow up will ‘raise’ the skill, turning it down will
‘lower’ it. You may also put a ‘lock’ on it to keep it at the
current level. Note: skills will only ‘lower’ once you reach 700
skill points this will cause the character to lose their young
status once 450 points is reached..
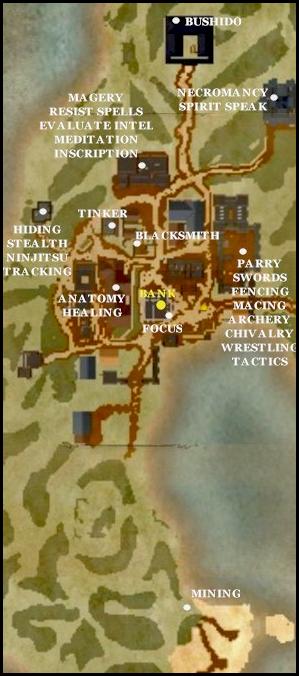
The location of trainers/quest givers for the various skills that give rewards
for the completion of gaining 50 skill points are highlighted on the
map opposite. There are other mini quests available in New Haven for
some other skills, however, I shall discuss them later and
concentrate on the ‘training’ quests for now.
Before commencing any training it is wise to note a few
points:
1. You cannot ‘buy’ skill points off the instructors if you
have a New Player Quest CURRENTLY on your character, irrespective of
whether you have no skill in the one you wish to learn, if a NP quest
appears in your quest log it is ‘current’.
2. If you are not a new player and intend to use soulstones
for any skill the same as (1) above applies.
3. If you CANCEL a quest once you have accepted it you will
NOT be offered it again even though you didn’t complete it.
Each new character starts off with the princely sum of 1000
gp’s. How you start your characters training off may depend on how far
you can make this money go, once you get into training you will loot the
bodies of your victims and gain more gold to further your training. I
cannot determine how much gold you will pick up so once you start you may
need to kill a few more things even if you are ready to move onto another
skill or class to train if you do not have enough gold to buy the skills/items you
may need.
A quick way to double or triple your money is to do a few
quick ‘escorts*’. Around the town are various quest givers,
‘wandering mages’, ‘merchants’, ‘messengers’, ‘nobles’ ‘brides’ and ‘grooms’. Each of
these will be titled ‘quest giver’ and will want you to ‘escort’ them to
various places in New Haven eg, ‘accompany me to the New Haven Inn’. By
accepting the quest, the quest giver will follow behind you and once you
arrive at the destination will give you 500gps for your
effort, as well as giving you some compassion* gains. For more
information see
escorting. You may do as many of these as you like, however, you need to
wait 5 minutes between each escort and only the first 5 in any day will give
you compassion gains (note: [young] players do not get compassion gains,
just gold). However, doing at least 5 will give you an additional 2,500 gold, enough to let you get a lot more skill,
have gold for tithing if
you are a paladin, or buying some armor from the tannery etc.
How to Interact with NPC’s, Instructors and Quest
Givers
Don’t forget to look
around on the ground around the bank, pretty much any armor, weapons,
scrolls, runes, clothing and any other miscellaneous ‘stuff’ can be sold
to the local shopkeepers to boost your funds (the provisioner in the
timber building next to the bank will buy most things). To sell*
items to a shopkeeper (known as an NPC ‘non player character’) hold
the <shift> key down, <right click> on the npc and select
‘sell’, a menu will appear and you can + the items you wish to sell. To buy*
items eg, bandages from the healer, scrolls from the mage or tools or
armor/weapons from the blacksmith the process is the same only select
‘buy’. However, for these guides I will assume you only have your ‘starting’
1000 gps
To ‘buy skill*’ of an instructor hold the
<shift> key down and <right click> on the instructor, a menu
will appear saying ‘train skill i.e. ‘train fencing’ etc. Click the skill
you wish to get training in and the instructor will tell you
how much to pay. To separate the gold from the stack*, hold
the shift key down and drag your pile of gold with your mouse to bring up
the quantity box, type in the amount and separate it from the gold
pile. Then drag this amount onto the head of the instructor and
release. He will take your gold and increase your skill to 30-40
points.
As you learnt with Gwen, to obtain a quest, double left
click the quest giver, read the instruction window and ‘accept’ the quest. Remember that you do not need to
take ANY quests until the skill points for the quest are 40+. You just
need to watch they don’t go to 50. Once you are fighting/training keep an eye
on your skill gain just to make sure any skill that is ‘rising’ doesn’t
reach 50 points. If a skill does go close, stop and run back to town and
pick up the quest for the skill that is rising so that you ‘complete’ the
quest and gain the reward item.
Click the links below for Training Guides
Warrior/Fighter which covers the
Warrior, Paladin, Samurai and Ninja Classes
Spell-Caster which
covers the Mage and Necromancer Classes
Trade/Crafter
which
covers the Blacksmith/Trade Class
Glossary
* compassion: one of the 8 virtues* in Ultima Online.
The
reward for following the path of this Virtue is the ability to increase
the amount of health another player receives upon their resurrection, as
long as you are the one that resurrects them through the use of magic or
bandages. Under normal circumstances, players only have one point of
health when they are resurrected. With this ability, you can increase that
amount up to 80% of their maximum hit points based on the level, or step,
of Compassion
you have attained.
* virtues: there are 8 virtues in UO. Following the path
of these virtues allows you to obtain some helpful additional
abilities. For more info see the Virtue
System.
Last modified: March 26, 2011