


Chat Journal
Return to: Client User Guide – Enhanced| Chat Journal |
| By Miss Echo of Spellweave.com, Reproduced with Permission. |
| Enhanced Client Guide Index |
When logging into EC a chat box appears with two tabs, System and Journal. Legacy Chat Mode is the default ‘mode’ for chat. This is set in the Main Menu/User Settings/Legacy Tab. Legacy mode is where you type and press <enter> to speak in game. If you elect not to use legacy mode you will change to ‘enter to talk’ mode. To talk in this mode would be <enter>type text<enter>. This allows you to assign the normal letter keys to macros/hotkeys without ‘typing’ the letters. For the purpose of this chat ‘information’ the examples are for ‘Legacy’ mode, if you use non-legacy then you must type <enter> before any other command.
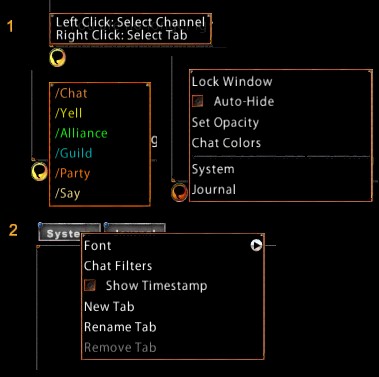
1. Putting your cursor over the chat icon on the bottom left corner of the window gives two options for left and right click. (Global Commands)
2. <right clicking> on either of the tabs ‘system’ or ‘journal’ brings up further options. (Tab Specific Commands)
Each of these is explained below.
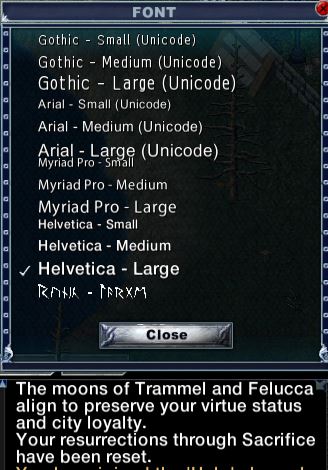
The Font option allows the selection of not only a different style of font, but also a different size
GLOBAL COMMANDS (the following are global commands that apply to each chat tab)
Chat Channels
Such as guild, party, alliance, chat etc may be selected by ‘Left Click: Select Channel’ on the bottom chat icon and selecting the mode as shown above.
This may also be done by typing into any chat window (rather than using the menu):
/s <spacebar> Normal Speech
/p <spacebar> Party Speech
/g <spacebar> Guild Speech
/a <spacebar> Alliance Speech
/c <spacebar> Global Chat
Lock Window
May be selected by ‘Right Click: Select Tab’ on the bottom chat icon and toggling the lock window text. When locked your chat window may not be resized or moved on your screen, and it remains ‘locked’ until such time as you ‘unlock’ it.
Auto Hide
May be selected by ‘Right Click: Select Tab’ on the bottom chat icon and checking the box to auto hide. When you elect to auto hide the window frame and tabs ‘disappear’ and only the text appears in your window with a left hand scroll bar.
Set Opacity
May be selected by ‘Right Click: Select Tab’ on the bottom chat icon, click on ‘Set Opacity’ to bring up the Opacity gump. Here you may use the sliders to nominate your ‘fade out’ and ‘fade in’ opacity on your chat windows.
Fade Out: changes the ‘visibility’ level of the chat border and tabs (faint to full visibility) when ‘auto hide’ is checked on.
Fade In: changes the ‘visibility’ level of the chat border and tabs (faint to full visibility) when ‘auto hide’ is checked off.
Chat Colors
May be selected by ‘Right Click: Select Tab’ on the bottom chat icon and clicking on chat colors. A gump will appear that allows you to select the color text that will appear in your chat windows. You may nominate the color by clicking on the type of chat (eg guild chat) and selecting the color you wish to view that type of chat in. Setting the colors in one character sets the colors for ALL characters on the account.
Tab Selection (system, journal etc)
May be selected by ‘Right Click: Select Tab’ on the bottom chat icon and clicking on the relative tab name. This allows you to toggle between chat windows if your ‘tabs’ are on ‘auto hide’ or faded. The list will include any tabs you have created.
Top
TAB SPECIFIC COMMANDS (the commands for ‘Font, Filters and Timestamps’ only apply to the ‘current’ tab you have selected on <right click>, created tabs will appear on all characters on your account and are not character specific.)
Font
May be selected by ‘Right Clicking’ on any chat window tab (as shown in 2 above). Select the small arrow to open up a gump with a selection of fonts available.
Chat Filters
May be selected by ‘Right Clicking’ on any chat window tab (as shown in 2 above). When clicked a gump appears with the various types of chat mode. Placing or removing a ‘tick’ against each of the modes will determine what mode will ‘report’ to whichever tab you ‘right clicked’ on. For example, if you turn them all off accept ‘system’ then all chat will disappear and only system messages will report to that chat window. See the ‘new tab’ description below for more detail on filters.
Show Timestamp
May be selected by ‘Right Clicking’ on any chat window tab (as shown in 2 above). This allows you to toggle between having the text ‘timestamped’ on or off in any particular chat window. It appears to the left of the text.
New Tab
May be selected by ‘Right Clicking’ on any chat window tab (as shown in 2 above). Selecting new tab will give you another tab. This may be useful for differentiating between different chat channels and is where the chat filter option(s) come in handy. Creating a new tab is saved to all characters on your account. So if, for example, you create a Tab which you name ‘Guild, that tab will appear on all your chat windows for each character. Shown below is a chat box with five tabs, right clicking on a tab allows you select the chat filter for that tab. In this case I have shown the ‘journal’ and ‘party’ filter settings. In the journal I have all modes of chat reporting and in party only the ‘party’ mode of chat reporting. This means that you can ‘play’ and see all chat/system stuff happening, but if you want to ‘view’ just what was said in party or guild etc you can click on that tab and it filters out all the miscellaneous chat, spells, messages etc. If you select ‘Custom’ as your filter then only chat from whatever ‘global’ chat channel you are in will appear in that tab. Global Chat selection is discussed in more detail in the Global Chat section of this guide.
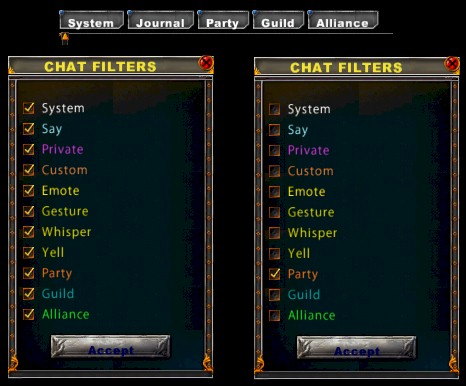
Publish 86, September changed the chat filters, see additional image. 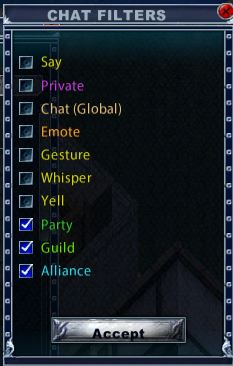
Rename Tab
May be selected by ‘Right Clicking’ on any chat window tab (as shown in 2 above). It is self explanatory and allows you to rename a tab.
Remove Tab
May be selected by ‘Right Clicking’ on any chat window tab (as shown in 2 above). It is self explanatory and allows you to remove a tab.
Top
Other
To ”’add someone to a party the command is:
/add <enter> (which will give you a cursor to target the person) or hold shift and right click on the person and select ‘add to party’ (left click on person in legacy targeting) or click on the person and then right click on the target bar to get the menu.
/quit (to leave party) You may also leave party by targeting yourself and right clicking on the target box and select leave party.
To repeat text just spoken (what <ctrl>+Q did in 2d) press <shift>+Page Up
Top
Last modified: September 30, 2014