Shame Dungeon Re-vamp – A Guided Tour
Return to: Dungeon Guides| Shame Dungeon Re-vamp – A Guided Tour |
| by Petra Fyde, November 2011 |
| level 1 | level 2 | level 3 | level 4 | level 5 | The Altars | Shame Video Tour |
Welcome traveller, I am your tour guide for today.
You will probably be familiar with the entrance to Dungeon Shame, but allow me to introduce you to its new residents.
The usual Scorpion can still be found here and there but the first residents you meet will be the diminutive Mud Pies and apparently familiar Earth Elementals, treat these last with a little respect, they are not as feeble as those you may have become used to fighting under this name.
Moving straight forward the path divides. To left and right the passages continue, but the road ahead is barred by a Cave Troll wall guardian. The area he guards houses the same denizens as those already introduced, plus one other. However the population is dense and there is a danger of an unwary adventurer becoming overwhelmed. The guardian is passive and stays close to his wall. To access the area he guards you will need to attack and kill him. Upon his death the wall will fall for a short time to allow you to pass.
Taking the left, west, passage will lead you around this central area and along the way you will find an altar.
Note the location, you may wish to return here at a later time.
As you approach the gate to the next level you will encounter the final inhabitant of this level, the Stone Elemental. There is also another Cave Troll, guarding the other side of the central area.
Take a moment to pause as you step through the gate, the tour continues when you cross the bridge.
Awaiting you on the far side, and spreading to left and right, you will find Mud Elementals. Moving forward, in a small alcove formerly populated by dull copper elementals, you will find Clay Golems and beyond those, as you get closer to the second bridge, Greater Earth Elementals. Here too you will find the second of the Shame Altars.
Kraken and sea serpents still swim in the underground river but bridge itself is blocked and guarded by a Cave Troll. You must defeat it if you are to travel further.
At this point a wise adventurer might give a thought to the consequences of death, should it occur on the other side of this barrier. There are no known medical facilities within the dungeon.
The final stretch from bridge to gate is populated by more Greater Earth Elementals with Clay Golems on the beach.
Exiting level 3 gate you find yourself faced with a choice, left or right. Turning left, west, and moving straight forward, ignoring the left turn towards the center, you may meet an odd air elemental or, further on, a poison elemental, but this narrow corridor can also often be found empty. Do not understimate these creatures, they are much stronger than those of the same name met elsewhere. At the end of this narrow corridor is a branch in which you may find the third of the Shame altars.
Passing by the branch with the altar you come at last to the central area populated by Air and Poison Elementals. Beyond it, straight ahead, is another narrow corridor leading off, here you will find Blood Elementals. Kraken and sea serpents swim in the lake. Turn now to follow the lake edge back towards the entrance. Poison and Air Elementals abound, here also you will find the entrance to the West Mage tower. Resident here are Corrupted Mages and their companions, Vile Mages. Turning away from the tower, return to the gate and move past it to explore the East, right, side of the level.
Two bright Flame Elementals will be met first. Beware, their fiery aura will damage you from a distance. As you reach the end of the corridor you will find Air Elementals and the entrance to the East Mage tower. Beyond the tower are more narrow passage ways. Approach these with care, this very small area houses no less than six fierce opponents, three Poison Elementals and three Blood Elementals, grouped together. Turning away from this area, pass the mage tower and head West along the side of it, where you will find Molten Earth Elementals and finally the gate to level 4.
This small level contains just two opponents, Eternal Gazers. An overheard comment wryly suggested that they are named thus because it takes an eternity to defeat one.
Finally, step through the gate to the deepest level, where you are met by Lars the Burning. This poor soul radiates heat of such intensity it will damage you if you get near him.
Moving foward you are again faced with a choice, to turn or to travel straight ahead.
Straight ahead, over the bridge, you will encounter Wind Elementals and Diseased Blood Elementals and pass the bridge over which resides one solitary Eternal Gazer. Approaching the lake, and along the lake edge you will find Molten Earth Elementals. Another narrow passage curls away from the waters edge. Here, in the company of a Diseased Blood Elemental, is the singular Chaos Vortex. There is no other in the dungeon.
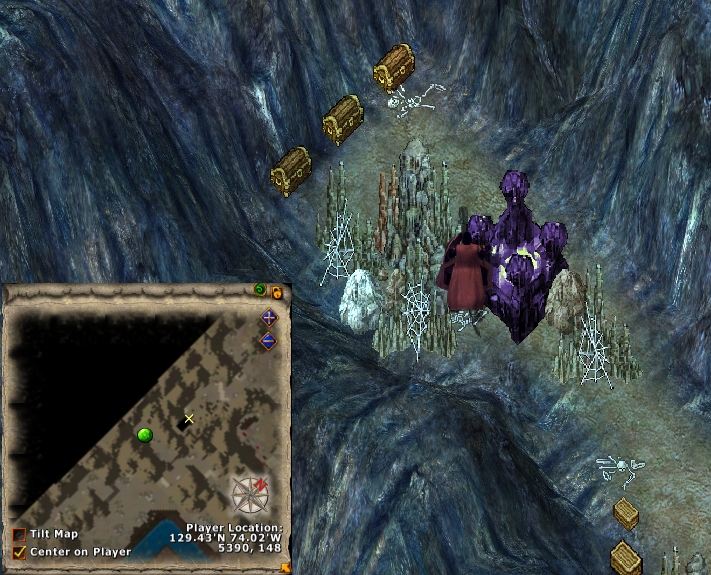
Continuing around the lake more Diseased Blood Elementals and Wind Elementals are found. Over the final bridge, shining brightly purple, is a Unbound Energy Vortex, or two, or perhaps even three? Stealthing close to these appears to be impossible, there is a strong suspicion that they possess the skill ‘detect hidden’.
There is just one denizen of these depths you have not yet met, a crazed human residing in the area near the small mage tower. Usually in the nearby small passage, but occasionally in the tower itself, otherwise the mage tower on this level is unoccupied, and therefore possibly available to be utilised by a beleaguered adventurer as a place of safety?
What use the three altars we passed along the way? Collect on your journey, from the creatures you fight, Shame Dungeon Crystals Double click them to gain the points from them, double click the altars to use the points.
Each altar will summon a renowned creature. This creature gives an idea of the difficulty facing the adventurer in the level below. The first altar requires 10 points, the second 20 points and the third 30 points.
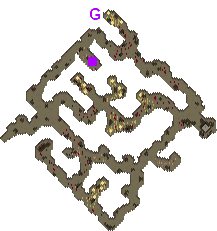
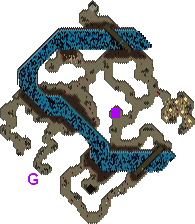
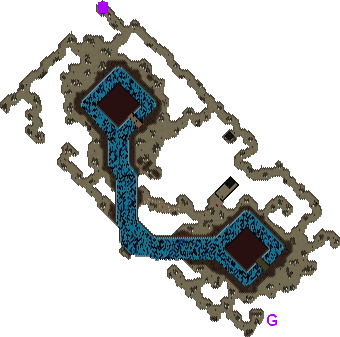
In the maps below the altar is marked by a purple box, the guardian will spawn at the point marked ‘G’
| The first altar’s guardian is a Quartz Elemental which appears at the end of a nearby off shoot from the main passage.
The Quartz Elemental will sometimes drop Quartz Grit (100% in Felucca) |
 |
| The second altar summons a Flame Elemental Guardian, appearing in a secluded area over the river accessible only by teleport.
The Flame Elemental Guardian will sometimes drop Corrosive Ash (100% in Felucca) |
 |
| Summoned by the third altar is a Wind Elemental Guardian. The spawn point for this is a considerable distance from the altar beyond the level gate.
The Wind Elemental Guardian will sometimes drop a Cursed Oilstone (100% in Felucca)
When combined together the quartz grit, corrosive ash and cursed oilstone become a Whetstone of Enervation
This item can be used to remove the damage increase property from a weapon. |
 |
Last modified: April 7, 2014


Thank you!
1