


Desktop Template
Return to: UO:KR User GuideCreating a Desktop Template
Guide Written by MissEcho
If you have a favourite
desktop ‘layout’ and have a few characters to set up in
UOKR, or just wish to redo your settings once you have
played for a while and discovered what settings you like
best, you may start (or restart) your characters with
a generic layout or ‘template’ to save yourself a lot
of time and formatting. This template may include any
common macros, user settings, key bindings and window
positioning that you prefer. It is done by duplicating
the data files on a ‘new’ character/s with that of an
established character, one which is already set up with
your preferred layout.
Step by Step Template Creation
1. Firstly decide which common features (eg macros, chat settings, graphic preferences, key bindings etc) you would like all your
characters to have and decide the preferred positioning of your windows, hotbars, backpack, maps, paperdoll and character sheet. Set
these up in your first character and when you are happy with the look and have tested that all is working fine, log out to save your
settings. You may add any ‘unique’ settings for this character after
finishing the template. It is a good
idea to log in again to make sure all your settings have been stored correctly before continuing. For the purposes of this exercise I
will refer to this character as ‘Character 1′ (if you are creating it
would be the name of your character).
2. Open your Windows Explorer and follow the path: My Documents/EA Games/Ultima Online/User Data/Account Name/Shard
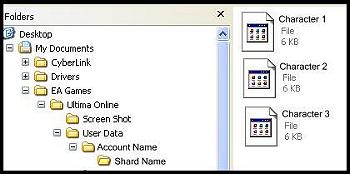
3. In the Shard folder you will find the user data files for any character you have previously logged into the client. In this case we
have 3 characters. If you wish to have all six characters with the same template then log those characters in and out to ensure they
have their user data file in the shard folder.
4. Double <left click> on the characters file who has the template, eg Character 1, and in the pop up window which
appears, scroll down and open the file with ‘notepad’. A notepad document will open with all the user data for your ‘set up’ character. In this
notepad go to the top menu and select: ‘File’, ‘Save As’, and change the name from ‘Character 1′ to ‘Template’ and click ‘save’.
This will save a text document in your shard folder if you wish to keep a ‘copy’ for future use or it maybe saved to any other directory
or deleted as you wish when you are finished. Leave this notepad document open to continue.
5. To duplicate this template to Characters 2 and 3, double <left click> on firstly character 2, and open its file as you did above in
step 4. You should now have 2 notepads open, one called ‘Template’ the other called ‘Character 2′. Put
your cursor in the notepad for ‘Template’ <right click> and ‘select all’, then <right click> again and select ‘copy’.
6. Now put your cursor in the notepad for ‘Character 2′, <right click> and ‘select all’, then <right click> again and select ‘paste’.
Still in the notepad for Character 2, go to the top menu and select: ‘File’, ‘Save As’. In the save screen go
to the drop down box that says ‘save as type’ change the ‘text document’ to ‘all files’. You will see your character files and template file appear in the top box.
Double click on the file for Character 2 and a prompt will open advising you
the file already exists and do you wish to replace it. Select ‘Yes’. This character is now complete.
7. To duplicate the template for Character 3, and for as many other characters as you wish, follow steps 5 and 6. It is best to work
with the one character file at a time until you are familiar with the process (i.e. just have one character notepad file and your notepad
template open at the same time). Once you are familiar with the process you could just do it with all your characters by opening all
character files you wish to use the template in and repeating just step 6 while the copied text from step 5 is still active on your
clipboard.
Other Hints and Information
If you have already played for a while, and wish to do a ‘restart’ of all your character layouts to give them uniformity of layout and
macros etc, then delete all your character files from the shard folder, log in to one character and set up their desktop as your
‘template’ character without any of that particular characters unique requirements which may be done
later. Log in the rest of your
characters to re-establish their user data files and proceed from step 2. (note deleting your user data files does NOT delete your
characters, they are permanently stored by EA on their servers).
If you have a particularly good layout you are able to share this with
friends and other players. Just send them the text file containing the
template. You can also modify the template from generic
style layouts to ‘class’ specific layouts (eg. generic layout + a good
set of fishing hotbars). The possibilities are endless.
It is advisable to not assign any keys when creating your template as
not all characters will require the same set up for actual game play,
plus, if you do wish to ‘share’ a template with another player the keys
you assign would not necessarily be the same. It is easier to assign the
keys once you start customising the unique keys for your individual
characters.
You are better off to put in a whole range of generic macros than just
one or two (eg: action macro ‘open door’ or say macro ‘all kill’). It
is much easier to establish your character with more rather than less as
a
simple <right click> ‘edit’ ‘clear’ will remove any macro a
character doesn’t require. So when making your template think about
all the common commands and actions you perform during general game play
and try to include as many of them as you can in your template. Deleting
them in the macro/actions commands is much easier than creating them, especially if
you have to create them in 6 or more characters!
Remember that anything created in a template is not ‘final’ and once
you have the basic layout you are still able to customise every single
setting, add or remove hotbars, macros, reposition windows or take it
back to a fresh start by just deleting the character file in your shard
folder. Nothing is forever.
Having a template created of your favourite settings
saved in your shard folder and/or another part of
your hard drive ensures you always have a backup copy
available to replace your settings in the event that
your character becomes ‘bugged’ in any way or if you
accidentally delete a hotbar or your macros. It is
also there in case you open another account and wish
to get a head start on your character creation or
if you just wish to add another character to your
existing account.
Sample Desktop and Template
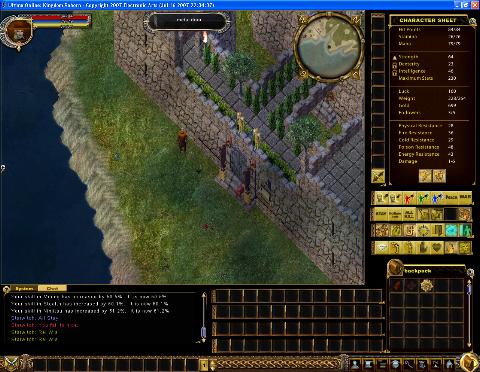
The following is a sample desktop and the relevant template text that matches
the layout as seen in Figure 3. It includes an explanation of what you are ‘getting’ with the
template. This is just to give you an ‘idea’ of what is possible with
creating templates and the benefits they may give you if you decide to have a
go at creating one.
|
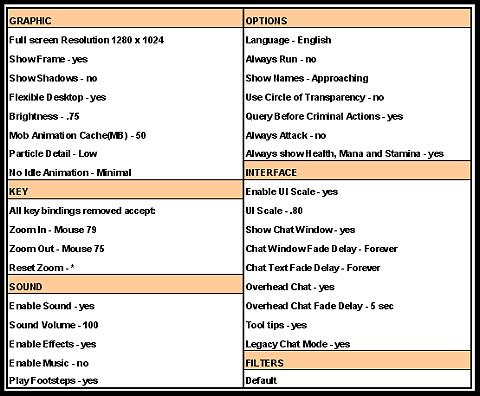
The desktop has been created with the user settings in Figure 2. The Features of the Desktop:
Obviously most characters will not require all these hotbars, they are Template Text The template text code to create this particular template is shown It may be copied and pasted direct from this page should you wish to Good Luck with your template creating!
Last modified: March 26, 2011 |