


Wishing Well
Return to: Step-by-Step Instructions| Better Homes & Castles : Designing and Decorating |
| Customizing Your Home | Decorating | Tips | Decorating Ideas | Step-by-step Instructions |
| Step-by-step Instructions |
| GMs and other statues | Pianos | Wishing Well |
How to build a well
By Waylander
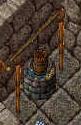 My design is more of a covered water well rather than a wishing well but you should be able to modify it slightly. A well takes up 3 floor tiles and requires the following material:
- a minimum of 10 spacers (go with 14 to be safe and I prefer bandages for this design),
- one small forge, four torches,
- one “pile of wool”,
- one small wooden shield,
- one open-topped keg,
- one quarter staff (the straight, brown kind) oriented in the direction you want your well oriented in (south-north, west-east),
- two bonnets (of the hat variety),
- one spell book (the # of spells in it doesn’t matter), and
- a dye tub with dye.
For orientation purposes, the three tiles will be referenced as follows: If your well is going to be oriented from North to South, the #1 tile is the southmost tile with #3 being the northmost tile and #2 between them. If the orientation is from West to East, the #1 tile is the westmost tile with #3 being the eastmost tile and #2 between them.
My well was oriented North-South so you may need to play with the West-East design a little.
Construction Steps
- Dye the two bonnets the same color as the quarterstaff then dye the pile of wool the desired color to simulate water. You’re finished with the dye tub.
- Place the small forge in tile #2. You don’t need to lock it down once placed. This will form the base of the well.
- We’ll now build the first upright support. In tile #1, place 2 spacers. Double click a torch in your backpack. This will cause it to light and jump to the floor, standing upright, near your character.
- Pick it up, drop it on tile #1, and lock it down. The spacers should help position the torch near the tile center. Drop 3 more spacers on tile #1 (they’ll appear on top of the torch flame). Double click on a second torch and drop it on tile #1 (it should jump up on top of the first torch and spacers) and lock it down.. Finally, take a dyed bonnet and also drop it on tile #1 (it should appear on top of the torches, covering the flame of the upper torch). The first upright is finished.
- Repeat steps 3 & 4 in tile #3.
- Now we build the crossbeam. Returning to tile #1, drop the quarterstaff on the tile. This should place it above the bonnet.
- Drag and drop the bonnet in tile #1 onto the spell book in your backpack. The bonnet should snap back after allowing the quarterstaff to drop down behind it. If you don’t like the bonnet being in front of the quarterstaff (I didn’t), simply drag and drop the quarterstaff onto your spellbook. Again, it will snap back and be _in_front_ of the dyed bonnets. I prefer this look because it appears to connect with the bonnets on both uprights.
- Lock down both bonnets and the quarterstaff.
- To finish the well, drop the dyed pile of wool on tile #2. It may take some doing to find the “sweet spot” but try the east edge of the tile or the south edge just west of the south-east corner. You may also need a single spacer to move it high enough to expose the well stone but you don’t want to expose the coals. Try the design with and without the spacer to see which you prefer. Once the pile of wool is placed where you want it, lock it down.
- Now drop the small shield on tile #2 (to form the well cover) and lock it down, followed by the open keg (lock THIS down).
- You’re finished!
Last modified: March 26, 2011