


Macros
Return to: Client User Guide – Enhanced| Macros |
| By Miss Echo of Spellweave.com, Reproduced with Permission. |
| Enhanced Client Guide Index |
![]()
| Creating Macros Adding Actions Setting Targets Assigning Hotkeys Editing Macros Clearing Macros Sample Macros |
To access the macro function, click on the Main Menu on the menu selection bar and select Macros.
A gump will open titled ‘Macros’ with the text ‘no macros found’ inside. Click on <Create> and two gumps open. An ‘Edit Macro’ gump and the ‘Actions’ gump used to create your macros.
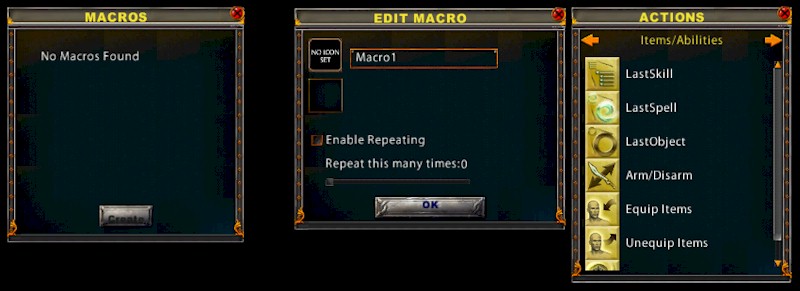
Macro box (‘No Macros’ text inside) = where the completed macros are stored
Edit Macro box = opens when ‘create’ is clicked and is where you create and edit macros
Actions box = opens when ‘create’ is clicked for performing ‘actions’ in your macros by dragging the action to the macro command boxes.
Most macros are relatively easy to create. Simple ones are created with four parts:

1. The ‘picture’ part: is the ‘visible’ icon you use to drag to your hotbar to identify the macro. This is the box (shown above) with text ‘no icon set’. To set a ‘picture’ in this box <left> click and a box of icons opens for you to select from. These have some ‘custom’ icons and icons of all spells, actions, weapon specials etc. Scroll down in here (with scroll bar or mouse wheel) to select the ‘picture’ you wish to use to identify your macro. <left> clicking on the icon will put it in the box.

The ‘Picture’ Icon box, opens when <left clicking> on the words ‘no icon set’.
2. The ‘command’ part: is where you put the actual ‘command’ part of the macro. To add ‘commands’ to this box drag spells (from spellbooks), skills (from skill menu), weapon abilities (from equipped weapon on the abilities sheet, actions from the ‘action box’ or items into the box (items may be dragged from your pdoll or backpack). How many ‘commands’ you put in a macro is up to you. You may have just the one spell, skill, item etc or multiple spells and/or a mixture of spells, items, skills. The options are unlimited.
3. The macro ‘name’ part: where you name your macro. This is a must if you have not selected a ‘picture’ icon, (which may be made without a ‘picture’ if it is not intended to be placed in a hotbar but just assigned a hotkey). It is handy to name all macros in case the ‘picture’ you have selected is not ‘obvious’ to the command it performs.
4. The ‘repeat’ part: this part is optional and allows you to enable repeating. You can repeat an ‘action’ up to ten times.
The action box allows you to ‘add actions’ into your macro such as Equip, Last Object, Delay etc. Scroll through this box to view the actions available, of click on the list name to get a drop down of all available lists. Drag the action icon you wish to use to the ‘command’ box. For a full list of actions available, their function and how to use them see the sample macros below or Actions. Actions may be used in macros, or as stand alone commands.
Setting Targets for your macros depends on what targeting preference you have set in Main Menu/User Settings/Legacy (either Legacy targeting ON or OFF). If Legacy targeting is ON you cannot <right> click to select your preferred target but must set it using one of the targeting options from the Actions box. If Legacy targeting is OFF, then setting targets in macros may be done by <right> clicking on the spell, skill, item etc. For example:
Greater Heal spell cast to Target ‘Self':
Legacy Targeting ON : requires the spell (dragged from spellbook), WaitForTarg (from Actions), Cursor Target Self (from Actions). The default ‘target’ for spells able to be cast on others is “cursor” so for all other target options you must select from the Action box as shown. Note: you could also use Cursor Target Stored and click on yourself with the target cursor that this action brings up.

Legacy Targeting OFF : requires the spell (dragged from spellbook), <right> click on the command (heal spell), select ‘target’ then ‘self’. (or stored if you wish to target yourself with cursor)

When using this targeting, the existing target setting is visually displayed in a small triangle located on the bottom left of the icon so you can see at a glance what option is set.
Blue = Self
Green = Cursor
Black = Stored
Red = Current
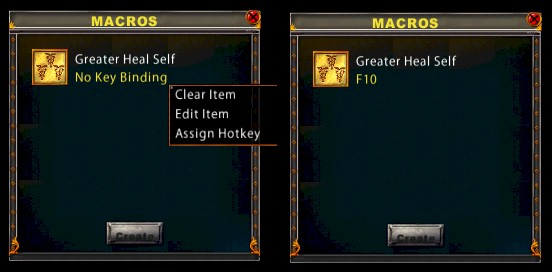
Once made all macros appear in the Stored Macro box and you will see the ‘picture’ icon you selected, the macro name and ‘no key binding’ which means the macro has not been assigned a hotkey. <Right> clicking on the picture will open a menu where your macro may be cleared, edited or assigned a hotkey (used to trigger the command). When ‘Assign Hotkey’ is selected you will be prompted to type in the key/s you wish to use to trigger the macro and the ‘no key binding’ text will change to the key/s you have selected. If the key/s you select are already in use you will be given a prompt asking if you wish to override the existing binding.
You may also assign hotkeys to a macro directly from a hotbar by dragging the ‘macro icon’ to a hotbar, right clicking on it and selecting ‘assign hotkey’
As shown above, once a macro is created you have the ability to ‘edit’ it. <Right> clicking on the picture of the icon you wish to edit will give you the menu to edit, clicking this will bring up the edit macro box. Here you may ‘add’ additional commands, change the order of commands by dragging and dropping them in the command line, change the name or repeating function etc. If your macro icon is placed in a hotbar, you may edit the macro directly from the hotbar by <right> clicking without the need to open the Macro selection from the Main Menu.
As shown above, once a macro is created you have the ability to ‘Clear’ it. <Right> clicking on the picture of the icon you wish to edit will give you the menu option to clear the macro, clicking this will remove the menu from the Macro Box, you will be prompted beforehand to ensure clearing is what you wish to do.
The Macro possibilities in EC are unlimited. The following samples are just a ‘taste’ of what can be created and are basically to assist you if this is the first time you have used this macro system. I have given a graphic and step by step instruction of what should go into the command line for these macros.
In all cases:
Go to: <Main Menu> <Macros>, click <create>, left click on <‘no icon set’>, scroll through and left click on a picture icon to identify your macro, name your macro, set repeating option if you wish to ‘repeat’ the macro. Add your ‘commands’ to the command line (ie; what you want the macro to ‘do’). Click OK to create the macro.
Once your macro is created and appears in the Macro box, <right> click on the icon to assign a hotkey in the macro box, or drag the icon to a hotbar and <right> click to assign a hotkey on the hotbar.
Note: there is differing opinions on the ‘best’ way to assign hotkeys to your macros/actions. Some people prefer to assign all hotkeys in the macro box (as shown above in ‘Assigning Hotkeys) others prefer to assign hotkeys by dragging the macro/action to the hotbar and assigning them there. Personally I prefer all my hotkeys assigned in the macro box so that all are ‘listed’ and I do not have to ‘find’ them on the hotbar to change hotkeys or clear them. It also means they do not have to take up hotbar space and are ‘trigged’ by typed key only. It is also beneficial if they are assigned here if you are intending to use the same macros/actions and hotkeys across multiple characters. This is explained under Template Creation. However, it is up to you which method you prefer. In a lot of cases it is ‘easier’ to assign from the hotbar, however, sometimes ‘easier’ in the initial set up means extra work down the line. The main thing is to be consistent in whichever method you elect to use.
| Macro Graphic | Command Line – Step by Step |
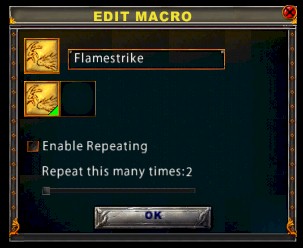 |
Single Spell:Drag a spell from your spellbook to the command line. Right click on the icon to ‘select’ preferred target (self, cursor, stored, current).Legacy targeting: default = “cursor” on spells that may be cast on ‘others’. See Setting Targets (above) for other targeting options in Legacy mode. Back |
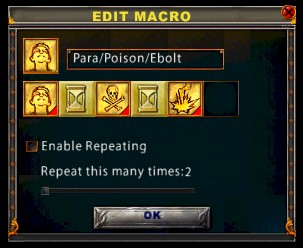 |
Multiple Spells:Drag a spell from your spellbook, drag in ‘delay’ from actions, set delay when prompted (eg: 3 sec to allow for casting time), drag another spell from your spellbook, drag in ‘delay’ from actions, set delay, repeat as many times as necessary. <Right> click on EACH spell icon to ‘select’ preferred target (self, cursor, stored, current). Back |
 |
Say & Use Skill:Drag the ‘All Kill’ action from pet commands, drag in ‘delay’ from actions, set the delay to allow for cursor targeting (eg .4 secs) Drag in hide command from skill menu. You could also use this macro and cast invisibility instead of using the hide skill. Back |
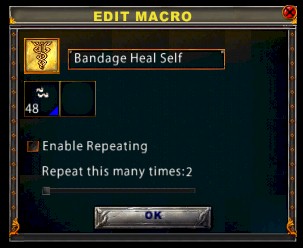 |
Healing Self with Bandages/Spells:Drag ‘bandages’ from your backpack or the ‘spell’ from your spellbook to the command line. <Right> click on the bandages/spell icon to ‘select’ preferred target ie ‘self’ (self, cursor, stored, current).Legacy targeting commands would be: bandages/spell, ‘wait for target’, ‘cursor target self’ as shown below. |
| Tips: Putting the pile of bandages into a hotbar will give you a visual bandage timer for when your macro is initiated. If you just want a cursor to bandage, by manually clicking on someone, then select target ‘cursor’. In legacy targeting the default, if bandages are dragged in, is already ‘cursor’. Although you do not need to create a macro for applying bandages, if you have a need for different targets ie self, cursor, stored, then macros make it easier to specify when to target each target type. Back | |
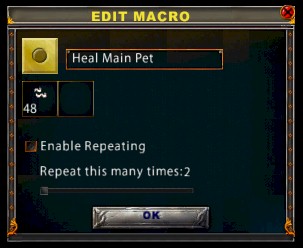 |
Healing Pets/Individuals with Bandages/Spells:Drag ‘bandages’ from your backpack or the ‘spell’ from your spellbook to the command line. <Right> click on the bandages or spell icon and select ‘target’ then ‘stored’. Target the pet/individual you wish to put bandages or cast the spell on. This macro will then always bandage/spell heal the pet/individual targeted. A must for tamers and x-healers.Legacy targeting commands would be: bandages/spell, ‘ wait for target’, ‘cursor target stored’ as shown below.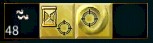 |
 |
An addition in publish 86, September 2014 allows up to 5 pets to be stored for individual targets. Place the ‘store default pet’ icon in a hotbar and target the pet, then us the ‘target default pet’ icon with bandages set to ‘current’ |
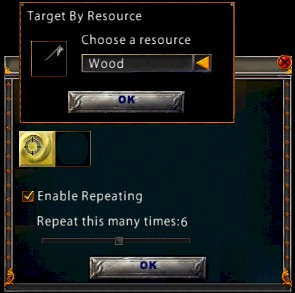 |
Target by Resource: Lumberjacking/Mining/Fishing Drag ‘Target by Resource’ from Actions to the command line. Place your Axe, Shovel or Fishing Pole in the pop up box and select ‘wood’, ‘ore’ or ‘water’. Set the repeat for how many ‘chops’/’digs’/’casts’ per run you want (will depend on how much your character can hold in weight). The client will select the next shovel from your backpack when the uses on the first are expired.From Publish 86, it is possible to use an action ‘set item type’. Adding this to a mining macro with the target ‘stored’ would allow you to smelt ore on a firebeetle as you mined. You would need to add the icon for each major ore type leaving small ores to be cleared up at the end of the macro run. Left is an example of a lumberjack macro in which the first icon equips the axe, the second targets the resource (tree), the third is a short delay, the fourth, target item type, is set to plain logs and the axe in the final slot is set ‘target current’. Repeat the last 3 icons for each of the other wood types as you discover them to chop wood as you go. Back |
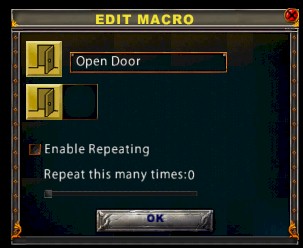 |
Open Door Drag ‘Open Door’ from Actions to the command line. Select OK and assign a hotkey. Nice to set this as a macro so it doesn’t need to be in a hotbar taking up a hotbar slot.Tips: Try assigning this macro to the ‘spacebar’ if you don’t use it for another macro. It makes running through doors easy and the spacebar is generally not used for macros that ‘trigger’ other actions. Unless you are standing directly in front of a door when ‘talking’ it will not ‘trigger’ the macro and is harmless if you are. Back |
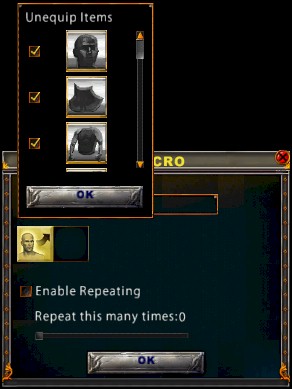 |
Undress/Un-equip:Drag the ‘Un-equip Items’ action to the command box. In the pop up box put a ‘tick’ against all item slots for a full undress. To un-equip both hands just select the hand slots, this works better than Arm/Disarm as it un-equips both hands. See the macro for Un-equip/Equip for weapon/dress swaps. Back |
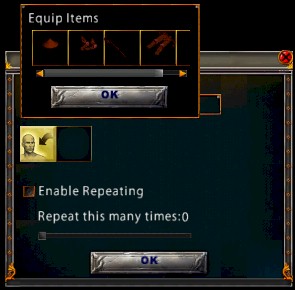 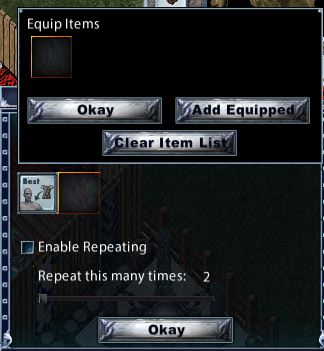 |
Dress/Equip:To make a full dress macro drag the ‘Equip Items’ action to the command box. In the pop up box drag all items off your paperdoll, armor & clothing tabs, or from your backpack into the boxes. When using the macro, the ‘slot’ for the item to be equipped needs to be empty. If you change an item, eg change your gloves, just right click on the ‘Equip Items’ icon in the command box, and select ‘edit’ to re-open and drag your new gloves into the boxes. You do not need to ‘scroll’ to the right on these boxes to ‘add’ things or change things, the new gloves will ‘override’ the old ones. This Macro is particularly handy after death to instantly redress. It is good to have on your hotbar so one click will ‘dress’ you after death if you don’t wish to assign it a hotkey. See the macro for Un-equip/Equip for weapon/dress swaps. BackAn extensive range of options was added to this function in publish 86, September 2014 making it possible to store several different outfits. When added to a macro the dialogue box now includes an option to add all that your character currently has equiped. |
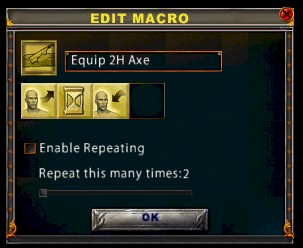  |
Un-equip/Re-equip:The options for this macro are many. You may wish to ‘toggle’ between two weapons, using two macros/hotkeys. You may wish to have an equip macro for a multitude of weapons either displayed in a weapons hotbar or on assigned hotkeys, you may wish to swap your armor from your normal fighting suit to a luck suit etc. In all cases of ‘switching’ weapons or armor I recommend using un-equip action prior to equip just to ensure the slots are free for the new weapon/armor pieces. The basis for creating these macros is the same in all cases.First drag in the un-equip action to the command bar. Put a ‘tick’ against the slots you want to clear, in the case of weapons I recommend both hand slots to ensure empty slots when swapping between 2 handed weapons and weapon/sheild combo. Next drag in the ‘delay’ action and set it to .1 to.3 of a second (depending on your connection). You need this delay to stop the ‘you must wait to perform another action’ error which will result if you don’t put it in. Next drag in the equip action icon and put in the weapon you wish to equip.A significant number of additions to equipment options were added in publish 86, including entire ‘actions’ lists for slayer weapons. It is recommended that players explorer the actions options thoroughly |
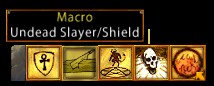
| In the example above I am swapping to a two handed axe. You need to pick a ‘picture’ icon that reflects as best you can something to identify it. In the Weapon hotbar example, from left to right, the icons refer to- Boomstick/Shield, 2H Axe, Demon Slayer, Undead Slayer, Dragon Slayer. Clicking once on any of them will un-equip whatever is in the characters hands and equip the nominated weapon choice.If you are switching armor suits I recommend a full ‘undress’ before redressing. It doesn’t matter if some items in both suits are the same, just put a tick against all slots as per ‘undress’ in un-equip (see above), put in the delay, and then drag in the equip items action and load in the new suit. If you are likely to be using a ‘suit swap’ macro regularly, eg between a normal suit and a luck suit, then your normal ‘dress’ macro should be set up like this so you may toggle between the suits. Basically have two macros, one to dress in your normal gear, one to dress in your luck suit, the macro will only ‘work’ if the relevant suit is in your backpack so the normal dress one can work all the time, the luck suit only if the suit is present. Back | |
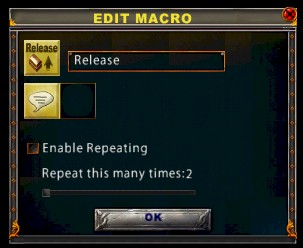 |
Say & Emote Macros These macros are generally used to ‘say’ or ’emote’ common and repetitive things in game rather than having to type them. Examples of these are:I wish to secure this I wish to release this I wish to lock this down I wish to place a trash barrel Bank Guards Balance Claim List Stable I must consider my sins *smiles* *bows* Pet Commands Boat CommandsTo create these select the picture most likely to identify the macro, drag in the ‘Say’ action and type in the pop up box what you wish to say. For ‘Emotes’ drag in the ‘Emote’ action rather than ‘say’. Using emote automatically puts *asterisks* around your text. Name the macro and OK. For the pet and boat commands, pre set wording is supplied in the pet and boat action menus, you may use these or use the ‘say’ command it is up to you. The number of preset commands was considerably expanded in Publish 86, September 2014, including the example left Back |
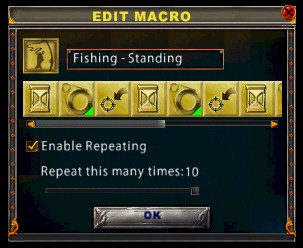 |
Fishing – Standing:Drag the ‘Delay’ action to the command line (set delay to approx 8.5 secs), drag in ‘Last Object’ action, <right> click on this and set target to ‘cursor’ (not necessary if Legacy targeting is ON), drag in ‘Cursor Target Last’ action. Repeat these three actions for as many times as you like. Set enable repeat for max of 10. Prior to running the macro, double click your fishing pole and target the water. Now run the macro to fish automatically while standing in one spot. Note: if the delay between when you pull up a fish and your next cast is too great/short, adjust the ‘delay’ by right clicking on ‘delay’ action, selecting edit, and altering the seconds up or down. BackThis macro is now obsolete, since ‘water was added to the ‘target by resource’ option. A more recent option would be ‘equip fishing pole’, target by resource (water), delay. The same macro will work while sailing ‘slow forward’. |
 |
Fishing – Sailing:Drag the ‘Delay’ action to the command line (set delay to approx 8.5 secs), drag in ‘Last Object’ action, <right> click on this and set target to ‘cursor’ (not necessary if Legacy targeting is ON). Repeat these two actions for as many times as you like. Set enable repeat for max of 10. Prior to running the macro, double click your fishing pole and target the water. While your boat is moving you will need to click the water each time you get a target cursor, however, the macro will continue to run for as many times as you have repeated the commands while you are moving along. Note: if the delay between when you pull up a fish and your next cast cursor is too great/short, adjust the ‘delay’ by right clicking on ‘delay’ action, selecting edit, and altering the seconds up or down. BackNow obsolete, see above. |
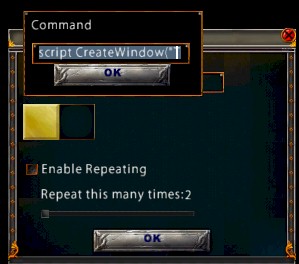 |
Command Action Macros:Dragging the ‘Command’ action from the action menu will give you a pop up box in which to type various commands. In the example shown a ‘script’ command: script CreateWindow(“TipoftheDayWindow”, true) has been inserted. When run this macro will ‘open’ the Tip of the Day Window. This command line will also work for various ‘/’ commands such as /listplayers to see who is also in the chat channel you are in. It is part of SA’s more advanced Macro system as yet to be fully explored by most users. It is expected that this command will be useful for UI modders making custom UI’s. Back |
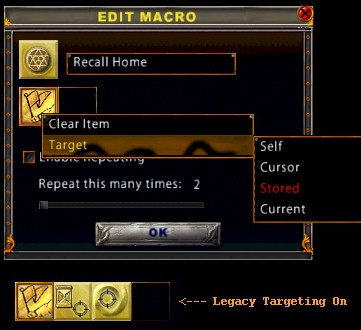 |
Recall Home/Specific Location:The Target Stored selection allows you to create macros using ‘items’ in your backpack. In this case a runebook. Drag the recall (or sacred journey) spell from your spellbook to the command line, <right click> on the spell and select ‘Target’ then ‘Stored’ and with the target cursor target the runebook in your backpack. Make sure the runebook has a ‘default’ location pre-set. When actioned the macro will cast recall and target the book to take you to your pre-set location.If Legac  y targeting is on then drag in the spell, “Wait for Target” icon from actions and then the “Cursor Target Stored” icon from actions and use the target cursor to target your book (it should look as shown at the bottom of the graphic). Back y targeting is on then drag in the spell, “Wait for Target” icon from actions and then the “Cursor Target Stored” icon from actions and use the target cursor to target your book (it should look as shown at the bottom of the graphic). Back
A considerable number of graphic options were added in publish 86 to allow you to better identify your destination.A small example is pictured. |
Last modified: October 1, 2014
Where is the macro file in ehanced client so I can backup it?
1C:\Users\yourpc\Documents\EA Games\Ultima Online Stygian Abyss\User Data
2Very helpful information and nicely presented.
3I’ve been searching for a way to macro the Blacksmith “smelt” process… don’t know how to tell macro that I want to smelt.
Also you used a slash command (/listplayers) in your explanation…. where can I find a list of these slash commands?
Thank You for this information