


Puzzle Rooms – Underworld
Return to: Miscellaneous| Solving the Underworld Puzzle Rooms |
| Submitted by Ruwendon, July 2010 |
Near the entrance to the Underworld, you’ll find a room with an open book and a glowing blue key. This room of three is the start of two puzzle rooms that eventually lead to a unique set of prizes. Be careful reading this book, it is protected by an arrow slinging gremlin! As you read the book, you’ll learn about the rules of the first puzzle room from its creator, Sir Wilbur. He’ll instruct you to double click on the glowing blue key behind the book to receive a key to the first puzzle room.
First
Puzzle Room
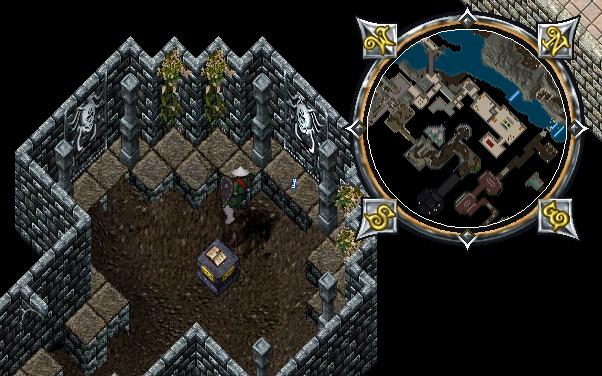
Once you get the key, you only have 30 minutes to enter the first puzzle room and complete the puzzles within in. This room can be found right around the corner, past the slimes and acid slugs:
There are three boxes in this room, each containing a puzzle. The first puzzle is in the box furthest west. Double clicking on this box will add a puzzle board to your backpack. Open the puzzle board to reveal the game board. This puzzle is exactly like the power generator puzzles in Ilshenar. You can find hints on how to solve this puzzle here
Once you complete this puzzle, you will receive a second key in your backpack. Your next task is to solve a second power generator puzzle in the box on the east side of the room. This puzzle is solved exactly the same as the first.
Lastly, when you have completed the east and west puzzles, you may receive a puzzle board from the northern box. This puzzle is different from the first two, but is exactly the same as the puzzle boxes in Khaldun. You can find hints on how to solve this puzzle here:
After solving the third and final puzzle box, you will receive an experimental gem. This is the key to final puzzle room!
There are two types of characters that are better at these rooms than others: characters with lockpicking and those that can heal with bandages. If you have a character with both, then you are in good shape. The lockpicking helps you solve the first two puzzles more quickly (see the power generator link for why). Also, it’s important to mention that every time you make a mistake with the first two puzzles, you are frozen and receive damage for several seconds. Characters cannot cast spells while frozen, so they take longer to complete the puzzle because you have to wait to be free from the puzzle to heal yourself. Those with bandages can use them even if frozen.
Second Puzzle Room
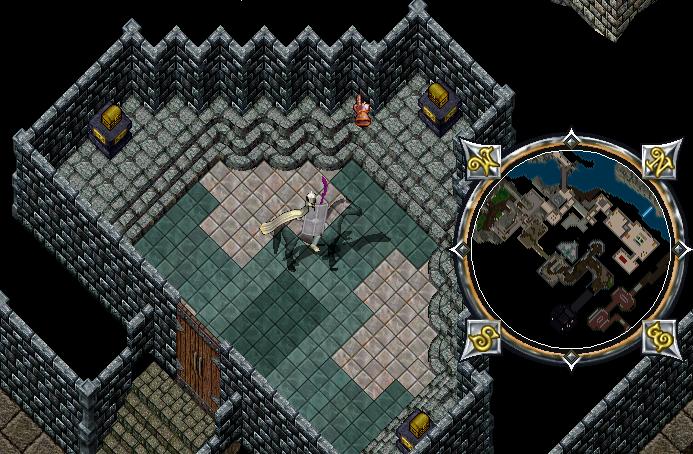
The second puzzle room is located on the west side of the underworld. From the first puzzle room, take the hallway west and pass through the rotworms. Continue west over the bridge and you’ll find a room full of undead:
There is a secret doorway in this room, directly in the center of the west wall:
Once in this room, you can read another book written by Sir Wilbur that explains the puzzle in this room. Heading west from the book, you will find both the entrance to the puzzle and a hitching post (if you wish to stable any pets with you).
You can only enter the puzzle by standing next to the doors and double clicking your experimental gem. Just like the first room, once you activate the puzzle, you have 30 minutes to solve the room before being removed.
Basics of the puzzle
This puzzle is not simple and requires some practice. The first important aspect of the puzzle is to memorize the color combinations. For each color, there is a matching color that is the “opposite”. The color combinations are:
- red/blue
- pink/white
- orange/light green
- dark brown/dark green
This puzzle contains three rooms. Each room has an increasing number of color tiles on the floor.
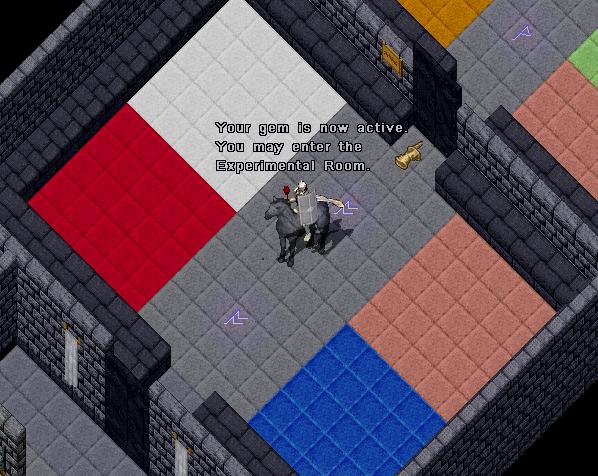
The first room has four colors (red, blue, pink and white):
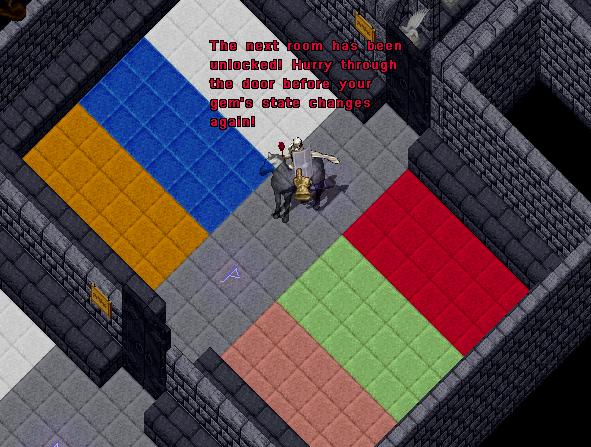
The second room has six colors (red, blue, pink, white, orange and light green):
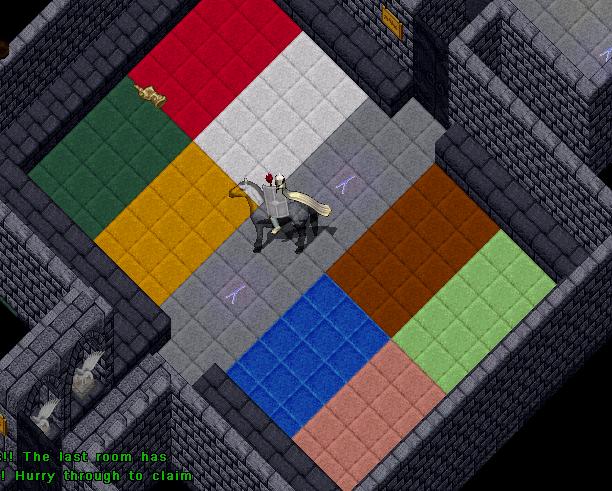
The third (and final) room has eight colors (red, blue, pink, white, orange, light green, dark green and dark brown):
The experimental gem in your pack is the “master” piece of the puzzle. As you enter the first room, it will begin to change colors. As it turns a certain color, you need to move your character to the “opposite” color. For instance, if it turns red, you move to the blue tiles. If it turns pink, you move to the white tiles, and so on. Once you move to the correct color, the gem will return to a “neutral” state of gray.
After you successfully complete eight rounds in the first room, you move through the north doors to the second room. Here you have two additional colors and must successfully complete fourteen rounds. Once you move to the third room, you have eight colors and must complete twenty-one rounds.
If you do not move to the correct tile fast enough, the state of your gem will “worsen”, which means that you are about to get kicked out of the puzzle room. You must get to the correct tile and stay until the gem returns to its neutral color (gray). If you fail to get to the correct color in time, you will be removed from the puzzle room and will have to re-enter and begin the puzzle again.
Once you get through the third room, you may enter the final room where you collect your prize:
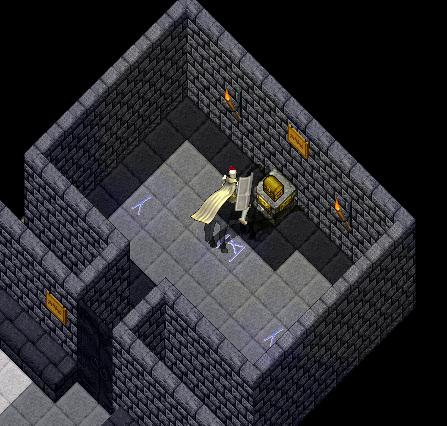
Prizes are random and include various stalagmites, flowstones, two story banner, hanging chainmail leggings, hanging ringmail tunic, plucked chicken, colorful tapestry and an easel without a canvas. They can be seen here
You may complete the puzzle once every 24 hours per character.
Hints
- Always use a mount to complete the puzzle
- Turn on “Your character will always run when checked”
- Return to the middle of the room as soon as the gem turns gray again – this will ensure that you are within reach of the next color
- Clear space in your backpack so that the gem isn’t near anything with colors and place the backpack near the screen
- Even though you can only complete the puzzle every 24 hours, you can use the same character to get the experimental gem every 2 hours. The gems are transferable to other characters, so if you have one that is perfect for the first puzzle room, you can use it to get the gems for all of the other characters.
- Memorize the color combinations! The puzzle moves too fast to think about which color to move to. Practice makes perfect.
Last modified: March 31, 2011