


Gardening Essay
Return to: Skills and Professions| Plantgrowing | Cross Pollination | Plant Crossing | Plant Colors | Fragrant & Peculiar Seeds & Plants | Colored Plant Oddities | UO Botany and Nutrition Forum |
| Professions: The Gardener |
| The Gardener |
| Plant Growing Using special seeds harvested from slain monsters, any character may grow uniquely colored plants to use as house decorations or to produce hybrid seeds and resources.As your plant grows from a seed to a full-grown plant, it will need watering and alchemical care in order to protect if from insect infestations and harmful fungi.Through the process of cross-pollination, you may even be the first person to grow a unique new hybrid plant type!Plant Bowl In order to plant a seed, you first need a special bowl. Plant bowls can be purchased from a provisioner for a small price.Once you have an empty plant bowl, you’ll need to fill it with dirt before you can plant a seed in it.
Water can be found in bakery shops and some stables (Skara Brae for instance). Serious gardeners will want to build a water trough in their house to have an everlasting water supply. Alternatively, you can fill the plant bowl with 20 pieces of fertile dirt.which may randomly lead to accelerated growth. Plant Seeds These plants can be used for decorative purposes, as a source of new hybrid plant seeds and specially grown resources, or in making baskets or stains. By using cross pollination and random genetic mutation, other seed colors can be created. Those colors are: bright blue Players that conclude the “Naturalist Quest” will obtain a rare colored seed. Known colors are ‘rare pink’ Special Bonsai seeds can also be found on most creatures in the Tokuno Islands. These will all look like normal Plain seeds Fragrant and Peculiar seeds can be found on a variety of creatures Fragrant seeds grow into cocoa trees and produce seeds and cocoa pulp. There are 17 different types of plants grown from peculiar seeds, determined by which monster group the seed came from. Most of these plants are’decorative’ only, however poppies, cypress trees, sugar cane and flax each produce a resource, though no seeds. There are no colored varieties obtained through hunting, however white and black versions of the plants can be obtained through the naturalist quest. The first step in growing a seed into a plant is planting it in a bowl of soft dirt. In order to plant a seed, simply double-click the seed to use it, and then target a bowl of soft dirt. Freshly dug dirt isn’t soft enough for a seed to be planted in, so you’ll need to pour water into your bowl of dirt before attempting to place a seed in it.
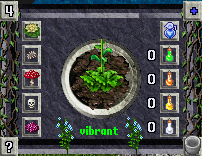
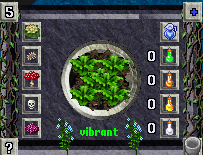
Plant Growth
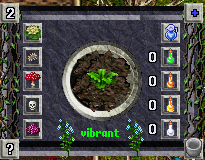
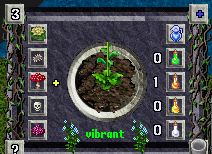
Plant Health From good to bad, a plant can be in one of the following conditions:
Greater heal potions and a plant’s natural healing will raise the plant’s hit points back up to its maximum, but only if the plant has been cured of all maladies first. If a plant loses all its hit points, it will die. As a plant grows, its maximum health increases. Seeds and saplings are very weak, and can easily be killed if neglected for even a short while. Full-grown plants, on the other hand, could survive for several days without any help. Infestation You can use greater poison potions on your plant in order to kill off the insects that have infested it. Be sure that you do not use too much poison, however, or your plant will soak up the poison, which can cause it to wither and die! You can view your plant’s current Infestation Level in the Plant Health menu. Infestation Level A yellow + sign means the plant has a small infestation. A red + sign indicates a severe infestation. Fungus You may cure your plant of fungus by using greater cure potions. You can view your plant’s current Fungus Level in the Plant Health menu. Fungus Level A yellow + sign means the plant has a small fungus infection. A red + sign indicates a severe fungus infection. Poisoned Plants When you apply greater poison potions, they will not take effect until the next growth check your plant performs (approximately once a day). Don’t worry, however, as insects only harm your plant during a growth check as well, so any insects will be killed off by your poison potions before they can harm your plant. If you accidentally poison your plant, you can cure the plant of poison by using greater heal potions to counteract the poison. To apply the potion, use the apply poison symbol Poison Level A yellow + sign means the plant is slightly poisoned. A red + sign indicates that the plant is severely poisoned. Diseased Plants When you apply greater cure potions, they will not take effect until the next growth check your plant performs (approximately once a day). Don’t worry, however, as fungi only harm your plant during a growth check as well, so any harmful fungi will be cured by your cure potions before they can harm your plant. If you accidentally infect your plant with a disease by over-curing it, you can use greater heal potions to counteract the disease. You may view your plant’s current Disease Level in the Plant Health menu. To apply the potion, use the apply cure potion Disease Level A yellow + sign means the plant is slightly infected. A red + sign indicates that the plant is severely infected. Watering Each time a plant performs its growth check (approximately once a day), the plant will soak up one dose of water, so you’ll need to keep a constant eye on your plant to make sure it has not dried out. You can view your plant’s current Water Level in the Plant Health menu. Water Level A yellow – sign indicates the plant is slightly under-watered. A red – sign indicates a severely under-watered. A yellow + sign indicates the plant has been slightly over-watered. A red + sign indicates the plant has been severely over-watered. Potions (Plants) The following potions may be used on plants: Heal Potions (Plants) If greater heal potions are applied to a plant that is not poisoned or diseased, and the plant has no other maladies currently affecting it, then the heal potions will be used to help increase the plant’s current hit points (in addition to the natural healing a plant performs if it is not currently infected by any maladies). To apply the potion, use the heal potion symbol Strength Potions (Plants) To apply the potion, use the strength potion symbol
Cross-Pollination Another method of pollination is called ”cross-pollination”. Once a plant reaches the pollen-producing stage, its pollen may be gathered by the owner by using the Cross-Pollination button. Gathered pollen may be used on another full-grown plant. When you pollinate one plant with pollen from another plant, the targeted plant will produce seeds that will grow into a hybrid of the two plants. The color and type of each ”parent” plant are combined to produce a new type of seed that will grow from the targeted plant. While you may continue to gather pollen from a plant throughout its entire life cycle, once a plant has been pollinated (either by itself, through natural pollination, or through manual cross-pollination from another plant), no further combinations may be performed. The seed type that the plant will produce is determined the first time the plant is pollinated, and cannot be changed afterwards. In very rare circumstances, cross-pollination may result in a ”mutation”. If mutation occurs, the targeted plant will not produce seeds that are a combination of the two ”parent” plants, but will instead produce ”mutated” seeds that grow into mutant plant varieties. An overview of what the results of cross-pollination are, can be seen on the cross pollination page. Pollination State
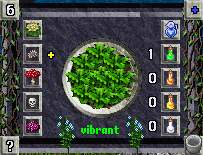
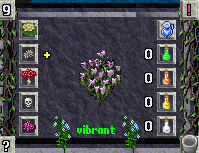
Seed Production The type of seed that a plant produces is determined by whether it pollinated itself, or if pollen from another plant was applied to it during the cross-pollination process. A plant will produce once seed per day, up to a maximum of eight seeds. A plant will only produce a seed if it is healthy. You may gather seeds from a plant by using the Gather Seeds button on the Resources menu. You will pick all available seeds from the plant and place them in your backpack, if there is room. The number of seeds available is displayed next to the Seed # indicator A red X symbol indicates that the plant has been set to decorative mode, or has produced its maximum amount. Resource Production A plant will begin producing resources at the same time it produces seeds, when it reaches its maximum growth level. One resource is produced per day, up to a maximum of eight resources. A plant will only produce resources if it is healthy. You may gather resources from a plant by using the Gather Resources button on the Resources menu. You will pick all available resources from the plant and place them in your backpack, if there is room. The number of resources available is displayed next to the Resource # indicator A red X symbol indicates that the plant has been set to decorative mode, or has produced its maximum amount. Resources produced by unique plant combinations have special properties dependant on the resource type and color. The following resources have been discovered:
Decorative Mode Pressing this button (and clicking Yes to apply) will set the plant to Decorative Mode. A plant set to Decorative Mode will not produce seeds or resources, and cannot be used for cross-pollination. A Decorative Plant does not need upkeep, however, and is always in a healthy state. Decorative Mode should be activated if you simply want your plant to be used as a house decoration, and therefore do not want to have to water it or keep it healthy. A Decorative Plant will have the tag [decorative] displayed above it when single-clicked. IMPORTANT NOTE : Once a plant is set to Decorative Mode, it cannot be set back to its normal state. A Decorative Plant will never produce seeds or resources again. These plants can be cut with clippers to produce either reeds, for Basket Weaving or clippings for Stains, very versatile dyes. Emptying the Bowl If the plant in the bowl is in the seed or sapling stage, emptying the bowl will result in a bowl and the seed placed in your backpack. If the bowl only had dirt in it, or the plant had grown beyond the sapling phase, emptying the bowl will destroy the plant, returning only the plant bowl to your backpack.
|
||||||||||||||||||||||
Last modified: April 25, 2013
“Alternatively, you can fill the plant bowl with 40 pieces of fertile dirt.which may randomly lead to accelerated growth.”
This should be 20 pieces instead of 40.
1oops, thanks. I forgot to edit this when they reduced it.
2