


Wagons & Carts
Return to: Echo Deco| Echo Deco |
| Decorating How To’s by Miss Echo of Oceania |
| Wagons & Carts |
| Introduction & Index |
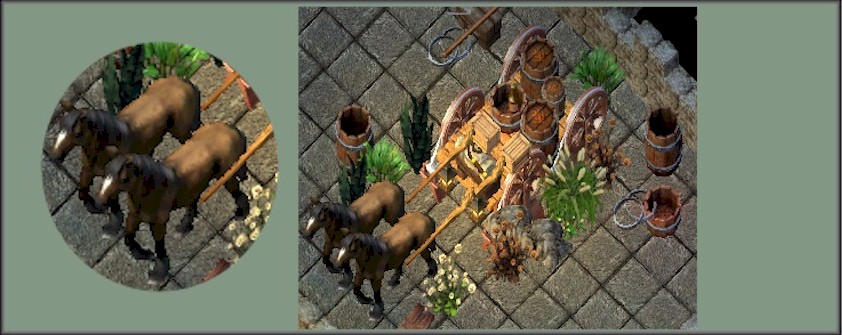
The introduction of Phillip’s wooden steed as a mini artifact drop from paragons gave the ability to to make pretty authentic looking carts and wagons with a correctly scaled horse achievable. There are heaps of varieties of wagon and cart themes that can be constructed for your deco, from beer wagons to funeral carts, royal carts and tinkers wagons. The types of wagons are really just up to your imagination! The only real limitation is that these horses are unable to be ‘turned’ with a deco tool, so if you want the horse pulling the cart you are basically limited to the one direction. However, if you just want the cart without the horse then either direction may be constructed in the same fashion. The above graphic is taken in full KR graphic mode, and is the beer wagon as shown below. As you can see horses in the full KR graphics are really great to look at. The construction graphics below are in KR legacy graphic mode. Further down there are some 2d shots as well of the same wagons.
How to Construct
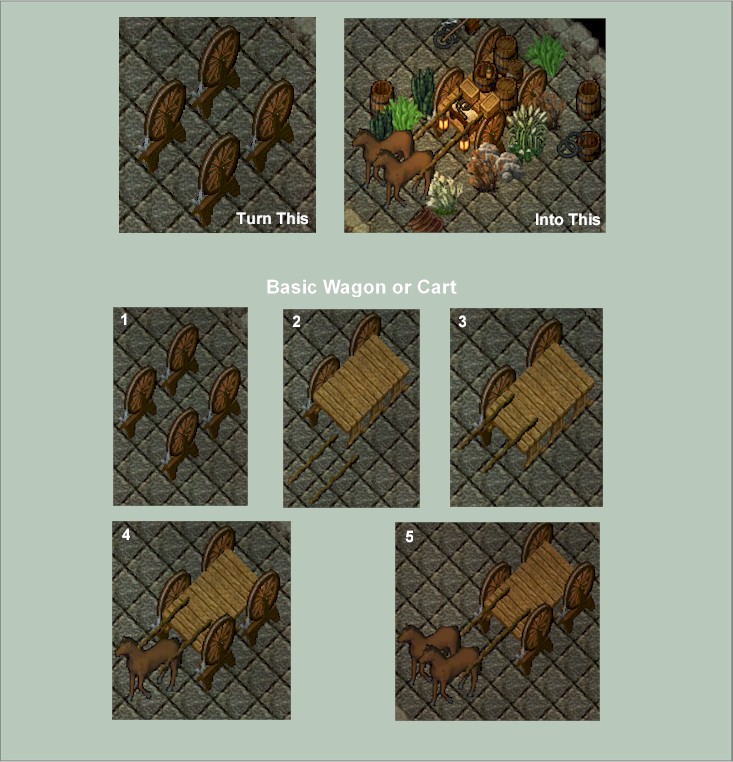
Basic Wagon
Room Needed: 5 tiles wide by 8 tiles long. (additional space for other deco around)
Pic 1: If wanting a horse to pull the wagon use 4 x Spinning Wheels [south] for your wheels. Place them where you think you want the wagon part to be located and check you will have room for your horses in front of them.
Pic 2: Remove the two wheels on the east side to enable placing the tables and until you have finished decorating the cart. Place 3 x Yew-wood tables on the tile row next to the remaining wheels and turn as in the picture. Place two gnarled staffs on the ground as shown and lock down.
Pic 3: Raise both gnarled staffs to the maximum height with the deco tool.
Pic 4: If using 1 horse you can put it in position and put the wheels on until you wish to finish the deco.
Pic 5: If wanting 2 horses then place another gnarled staff on the tile in front of the other staff on the eastern tile and raise to extend the rail an additional one or two tiles to your preference.
That is the ‘basic’ 4 wheel wagon that may be built for all types of ‘themes’ The width of the wagon may be made wider by adding additional tables or longer as you require.
Decoration Ideas
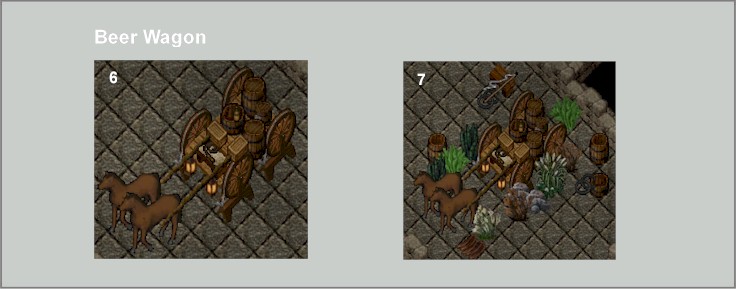
Beer Wagon
Pic 6: Taking the wagon used in the construction phase add barrels, kegs, crates, bottles of ale, a bench seat with a bedroll as padding, a whip and a couple of coach lanterns to dress it up. All are placed just by dropping and lifting with the deco tool, you may need to use ctrl-shift to find some things, it is just a matter of fiddling with it til you get it looking how you like.
Pic 7: Once your wagon is done, add some around deco to blend it into the overall ‘theme’. Rocks, plants, the odd barrel and tub with barrel staves and hoops all add to the atmosphere and assist to ‘hide’ the bases of the spinning wheels.
Funeral Wagon
Pic 8: This wagon is longer than the beer wagon above. In its construction use 8 tables, turned the opposite way as to the ones in the beer wagon, (4 in 2 rows of tiles) and space your wheels further apart. This wagon places a Coffin ‘add-on’ on top of the tables. To do this, as with a lot of add-ons you need to use the goza trick to raise them. Remove the front east wheel so that you can see the tiles just under the tables and place 3 single tile gozas as show in the position below. A coffin covers 3 tiles, hence three gozas.
Pic 9: Raise these gozas with your deco tool until they are centred on the tables as shown.
Pic 10: Target the middle goza to place your coffin, then being careful not to chop your coffin, chop the ‘visible’ gozas with an axe to remove. One will stay under the coffin. When using gozas in this way, if your add-on splits in two due to one side dropping make sure you raise that side to be perfectly matched to the other side before you chop it. If you chop it while the parts are mismatched you will destroy the add-on.
Pic 11: Now decorate your wagon however you like. I have used, 2 torches, two snowdrops, 3 diseased bark pieces, 2 ornate elven chairs, a fishing pole (pretend whip) and 3 roses in a vase with the flowers dyed yellow.
Pic 12 & 13: No wagon is really complete until the rest of the ‘theme’ is established around it. Here I have used a fountain, an apple tree some o’hii rubble trees, and morning glory rubble plants as well as 4 types of tombstones to add that cemetery feel. Pic 12 is taken in a 2d screenshot, pic 13 is a pure KR graphic screenshot. Personally I love the look of that particular KR shot as the horses and fountain look so much more ‘real’ although the perspective on the fountain seems a touch odd, still it looks so much more real with the ‘drops’ of water hitting the pond than the 2d or the KR legacy view fountains. The coffin also seems much more ‘substantial’ to me as well.

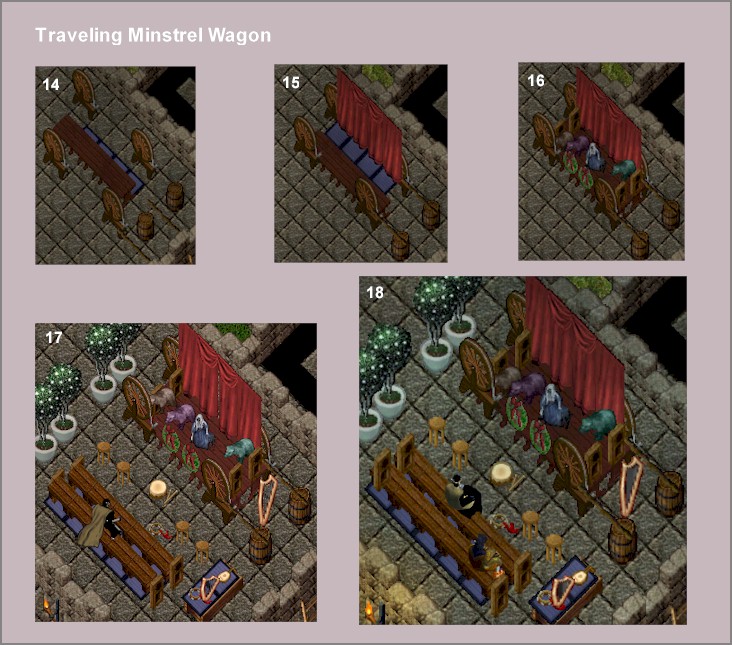
Traveling Minstrel Wagon
Pic 14: This shows the beginning of the Minstrel wagon. Place the east spinning wheels as shown and the barrels and staffs. There are 4 tables in the first row and behind, where shown, place 4 gozas to allow lifting of the curtains to on top of the tables.
Pic 15. Lock all down and raise the staffs to maximum height, raise the front spinning wheels x 10 to bring them level with the position of the ones behind, raise the gozas to the top of the table and place your curtains. Target the second goza in from the east side. Once the curtains are placed remove the gozas and place a second row of tables behind the first. You may wish to place with a trash barrel as in curtain making, to make it easier to get them in on the correct tile.
Pic 16: Decorate your Minstrel wagon with whatever you like, the one depicted is Silverlocks and the Three Bears :).
Pic 17: Again decorate around your wagon in ‘theme’ to set it off. Pic 17 is in 2d, Pic 18 is in KR Legacy View.
Flower Cart
Pic 19: is a small flower cart made from 2 spinning wheels and two plain low tables. Decorate with flowers of your choice, ideal for small spaces.
Pic 20: the same cart in a decorated area. The pergola is made from 4 pick pocket dips and gnarled staffs in both directions. W/E staffs are only available as loot off monsters. N/S staffs may be crafted. Vines and grapes adorn the pergola, a small bird bath made from a Christmas statue of Julia, a bowl of purification and a heating stand in valorite.

Last modified: March 26, 2011