


Hotbars
Return to: Client User Guide – Enhanced| Hotbars |
| By Miss Echo of Spellweave.com, Reproduced with Permission. |
| Enhanced Client Guide Index |

Default Hotbar
When entering EC for the first time you have one default hotbar. This bar shows the hotkey ‘bindings’ assigned to the bar from F1 to F12. This hotbar may never be ‘destroyed’ to avoid you losing all your hotbars although the key assignments may be removed/changed. A hotbar allows you to place the various icons for spells, skills, virtues, stats into them, as well as any item such as ethy mounts, bags, weapons, bandages etc. Anything in a hotbar may have a ‘hotkey’ assigned to it to enable whatever is in the bar to be ‘used’. More on assigning hotkeys is described below.
![]()
Creating/Deleting Additional Hotbars
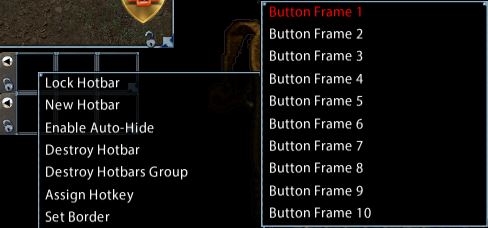
You may create as many hotbars as you like. To create a hotbar <right> click on any box in the default bar and select ‘new hotbar’. The following dialogue box will open.

To delete a hotbar, or group of hotbars, is the same process only select ‘destroy hotbar’, you will be given a prompt to ensure this is what you wish to do. When a hotbar is ‘destroyed’ any key assignments used in that bar will be unassigned. Enable Auto Hide will cause a hotbar to fade out to invisible until you mouse over it. Set border will change the color of the border around the hotbar boxes.
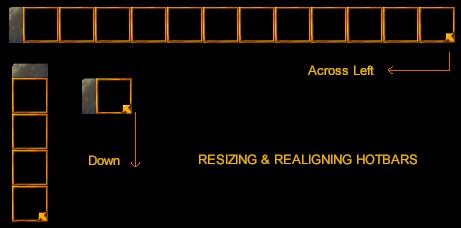
Resizing and Customizing Hotbars
You may customise your hotbars either horizontally or vertically and may move them anywhere on your screen. A hotbar may be from 1 to 12 boxes in length. Placing hotbars ‘together’ will ‘dock’ them to assist in positioning. If your hotbar is ‘full’ of icons and assigned keys, you may still change its size and alignment and whatever is in the box will remain in position with the same key assignments.
Placing Icons in Hotbars
Customizing has never been easier, just drag and drop spells, skills, virtues and created macro icons, ethereal mounts, weapons, bandages, runebooks, spellbooks, bags of sending, talismans, pet balls, food, and any other item you like into a hotbar for ‘one click’ access. No more shuffling through your backpack to find those ‘orange petals’ when a quick poison fix is required, need a potion just click on it! Icons may be dragged from your paperdoll, spellbooks, the created macro, action & skill gumps, your character sheet and your backpack. The options are unlimited.
Examples/Hints:

From top row left: Mage spell ‘energy vortex’ from spellbook, Hiding icon from skill menu, Sacrifice virtue from action menu, ‘all kill’ say command from action menu, ‘dress me’ icon from created macros, release item command from actions, ethy mount, bag in backpack, deco tool, crafting tool, dye tub and dyes, runebook, war cleaver, bos, gold, deed, bandages, scissors, weight icon from character sheet, hitpoint icon from character sheet, necro spellbook, primary & secondary weapon abilities from character sheet.
If you have a ‘bag’ of items in your backpack you may place this bag into a hotbar and access the items from the hotbar itself by clicking on the bag to open it.
Any stacked items will give a visual display of how many you have.
When bandages are ‘in use’, if placed in the hotbar, you will be given a ‘countdown’ on the seconds until application.
When an item is no longer in your backpack it will ‘grey out’ to show you it needs to be replaced.
If you have the ‘weight’ icon, from the character sheet, placed in your hotbar it will turn a dark blue ‘hue’ as you become overweight as a visual indicator.
Selecting ‘target cursor’ on your BOS in a hotbar means you can click it once or assign it a hotkey and click on your gold to send it to the bank.
Clicking a spellbook or runebook in a hotbar will open the book.
Targeting a runebook in a hotbar, that has the default location ‘set’, with a cursor from ‘recall’ or ‘sacred journey’ will take you to that location.
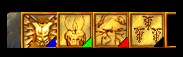
Visual Target Indicator/Setting the Target
If Legacy Targeting is checked ‘off’ in Main Menu/User Settings/Legacy and you are using the MMO targeting your hotbars will display a visual ‘color coded’ indicator to show the current target ‘set’ for the item in the hotbar. As shown below the ‘four’ targeting options are:
Blue = Self
Green = Cursor
Red = Current
Black = Stored
To ‘set’ the required target, <right> click on the icon and place your cursor on the word ‘target’, you will be presented with the above options. If you select ‘stored’ then you will be given a target cursor to ‘click’ on the person, pet, item that needs to be ‘stored’, this will then be targeted each and every time you ‘use’ that icon/macro/hotkey. Note: this may NOT be done if using legacy targeting.
Assigning/Removing Hotkey Bindings
To assign or remove a hotkey binding including the default hotkey bindings (F1-F12 shown above) <right> click on the hotbar box and select ‘Assign Hotkey’. You will be given a prompt “Please press the keys you wish to bind to this action. Pressing ESCAPE will clear the current binding.” It is as simple as that. Key assigning is irrespective of the targeting system and is used in both types. When assigning a key from a hotbar, the keys you select will be displayed on the icon (eg F1) although if keys are assigned in the macro creation system those key settings will not display on the macro icon in a hotbar. If you have already ‘used’ the key or key combination you select, you will be advised that you have already bound those keys to a different icon and asked if you wish to ‘overwrite’ the existing binding. This applies when assigning hotkeys directly from the hotbar or within the macro creation system.
Last modified: September 30, 2014